# Table of Contents
# ConstraintLayout
ConstraintLayout은 RelativeLayout과 유사하지만 LinearLayout의 가중치를 추가하여 보다 유연하게 자식 뷰를 배치할 수 있습니다. ConstraintLayout은 제약조건(Constraint)을 사용하여 뷰를 배치합니다.
# 설정
ConstraintLayout을 사용하려면 아래와 같은 의존성을 추가해야합니다.
dependencies {
    implementation 'androidx.constraintlayout:constraintlayout:$constraintlayout_version'
}
# 부모 뷰를 기준으로 배치하기
다음 속성을 사용하면 뷰에 제약조건을 추가할 수 있습니다.
| 뷰 이름 | 설명 |
|---|---|
app:layout_constraintTop_toTopOf | 현재 뷰 상단과 다른 뷰 상단 사이에 제약조건을 추가 |
app:layout_constraintBottom_toBottomOf | 현재 뷰 하단과 다른 뷰 하단 사이에 제약조건을 추가 |
app:layout_constraintStart_toStartOf | 현재 뷰 시작점과 다른 뷰 시작점 사이에 제약조건을 추가 |
app:layout_constraintEnd_toEndOf | 현재 뷰 끝점과 다른 뷰 끝점 사이에 제약조건을 추가 |
예제를 살펴봅시다. Button 0의 상단과 부모 뷰의 상단 사이에 제약조건을 추가하면 다음과 같습니다.
<?xml version="1.0" encoding="utf-8"?>
<androidx.constraintlayout.widget.ConstraintLayout xmlns:android="http://schemas.android.com/apk/res/android"
    xmlns:tools="http://schemas.android.com/tools"
    android:layout_width="match_parent"
    android:layout_height="match_parent"
    xmlns:app="http://schemas.android.com/apk/res-auto"
    android:orientation="horizontal"
    tools:context=".MainActivity">

    <Button
        android:id="@+id/button0"
        android:layout_width="wrap_content"
        android:layout_height="wrap_content"
        app:layout_constraintTop_toTopOf="parent"
        android:text="Button 0"/>

</androidx.constraintlayout.widget.ConstraintLayout>

이제 Button 0의 하단과 부모 뷰의 하단 사이에 제약조건을 추가해봅시다.
<?xml version="1.0" encoding="utf-8"?>
<androidx.constraintlayout.widget.ConstraintLayout xmlns:android="http://schemas.android.com/apk/res/android"
    xmlns:tools="http://schemas.android.com/tools"
    android:layout_width="match_parent"
    android:layout_height="match_parent"
    xmlns:app="http://schemas.android.com/apk/res-auto"
    android:orientation="horizontal"
    tools:context=".MainActivity">

    <Button
        android:id="@+id/button0"
        android:layout_width="wrap_content"
        android:layout_height="wrap_content"
        app:layout_constraintTop_toTopOf="parent"
        app:layout_constraintBottom_toBottomOf="parent"
        android:text="Button 0"/>

</androidx.constraintlayout.widget.ConstraintLayout>

Button 0의 끝과 부모 뷰 끝 사이에 제약조건을 추가합니다.
<?xml version="1.0" encoding="utf-8"?>
<androidx.constraintlayout.widget.ConstraintLayout xmlns:android="http://schemas.android.com/apk/res/android"
    xmlns:tools="http://schemas.android.com/tools"
    android:layout_width="match_parent"
    android:layout_height="match_parent"
    xmlns:app="http://schemas.android.com/apk/res-auto"
    android:orientation="horizontal"
    tools:context=".MainActivity">

    <Button
        android:id="@+id/button0"
        android:layout_width="wrap_content"
        android:layout_height="wrap_content"
        app:layout_constraintTop_toTopOf="parent"
        app:layout_constraintBottom_toBottomOf="parent"
        app:layout_constraintEnd_toEndOf="parent"
        android:text="Button 0"/>

</androidx.constraintlayout.widget.ConstraintLayout>

Button 0의 시작과 부모 뷰의 시작 사이에 제약조건을 추가합니다.
<?xml version="1.0" encoding="utf-8"?>
<androidx.constraintlayout.widget.ConstraintLayout xmlns:android="http://schemas.android.com/apk/res/android"
    xmlns:tools="http://schemas.android.com/tools"
    android:layout_width="match_parent"
    android:layout_height="match_parent"
    xmlns:app="http://schemas.android.com/apk/res-auto"
    android:orientation="horizontal"
    tools:context=".MainActivity">

    <Button
        android:id="@+id/button0"
        android:layout_width="wrap_content"
        android:layout_height="wrap_content"
        app:layout_constraintTop_toTopOf="parent"
        app:layout_constraintBottom_toBottomOf="parent"
        app:layout_constraintEnd_toEndOf="parent"
        app:layout_constraintStart_toStartOf="parent"
        android:text="Button 0"/>

</androidx.constraintlayout.widget.ConstraintLayout>

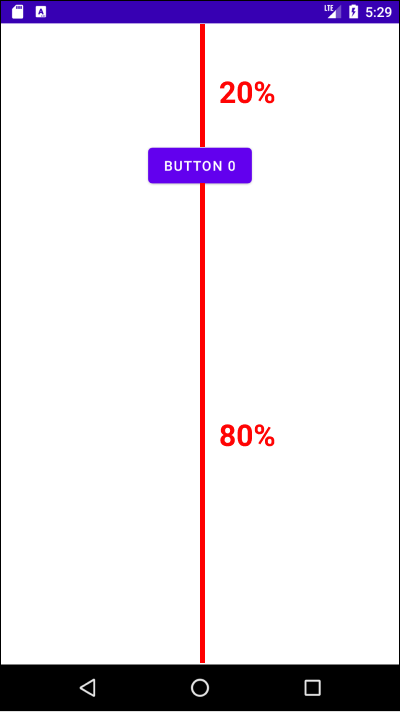
app:layout_constraintVertical_bias 속성을 사용하면 세로축으로 Bias를 추가할 수 있습니다. app:layout_constraintVertical_bias="0.2"으로 설정하면 다음과 같습니다.
<?xml version="1.0" encoding="utf-8"?>
<androidx.constraintlayout.widget.ConstraintLayout xmlns:android="http://schemas.android.com/apk/res/android"
   xmlns:tools="http://schemas.android.com/tools"
   android:layout_width="match_parent"
   android:layout_height="match_parent"
   xmlns:app="http://schemas.android.com/apk/res-auto"
   android:orientation="horizontal"
   tools:context=".MainActivity">

   <Button
       android:id="@+id/button0"
       android:layout_width="wrap_content"
       android:layout_height="wrap_content"
       app:layout_constraintTop_toTopOf="parent"
       app:layout_constraintBottom_toBottomOf="parent"
       app:layout_constraintEnd_toEndOf="parent"
       app:layout_constraintStart_toStartOf="parent"
       app:layout_constraintVertical_bias="0.2"
       android:text="Button 0"/>

</androidx.constraintlayout.widget.ConstraintLayout>
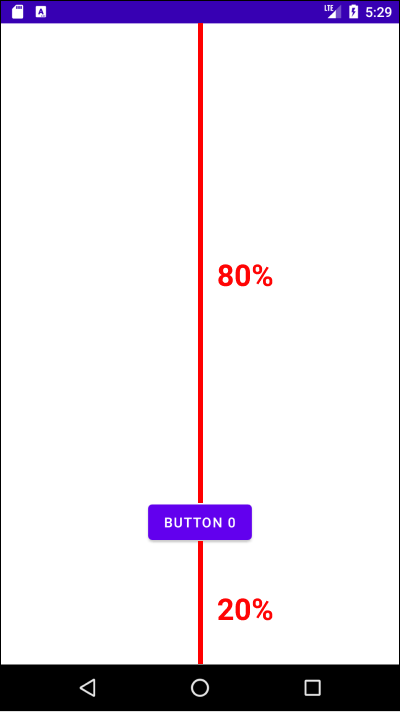
app:layout_constraintVertical_bias="0.8"으로 설정하면 다음과 같습니다.
<?xml version="1.0" encoding="utf-8"?>
<androidx.constraintlayout.widget.ConstraintLayout xmlns:android="http://schemas.android.com/apk/res/android"
    xmlns:tools="http://schemas.android.com/tools"
    android:layout_width="match_parent"
    android:layout_height="match_parent"
    xmlns:app="http://schemas.android.com/apk/res-auto"
    android:orientation="horizontal"
    tools:context=".MainActivity">

    <Button
        android:id="@+id/button0"
        android:layout_width="wrap_content"
        android:layout_height="wrap_content"
        app:layout_constraintTop_toTopOf="parent"
        app:layout_constraintBottom_toBottomOf="parent"
        app:layout_constraintEnd_toEndOf="parent"
        app:layout_constraintStart_toStartOf="parent"
        app:layout_constraintVertical_bias="0.8"
        android:text="Button 0"/>

</androidx.constraintlayout.widget.ConstraintLayout>
이제 android:layout_height="match_parent"로 설정해봅시다.
<?xml version="1.0" encoding="utf-8"?>
<androidx.constraintlayout.widget.ConstraintLayout xmlns:android="http://schemas.android.com/apk/res/android"
    xmlns:tools="http://schemas.android.com/tools"
    android:layout_width="match_parent"
    android:layout_height="match_parent"
    xmlns:app="http://schemas.android.com/apk/res-auto"
    android:orientation="horizontal"
    tools:context=".MainActivity">

    <Button
        android:id="@+id/button0"
        android:layout_width="wrap_content"
        android:layout_height="match_parent"
        app:layout_constraintTop_toTopOf="parent"
        app:layout_constraintBottom_toBottomOf="parent"
        app:layout_constraintEnd_toEndOf="parent"
        app:layout_constraintStart_toStartOf="parent"
        android:text="Button 0"/>

</androidx.constraintlayout.widget.ConstraintLayout>

android:layout_width="match_parent"도 설정해봅시다.
<?xml version="1.0" encoding="utf-8"?>
<androidx.constraintlayout.widget.ConstraintLayout xmlns:android="http://schemas.android.com/apk/res/android"
    xmlns:tools="http://schemas.android.com/tools"
    android:layout_width="match_parent"
    android:layout_height="match_parent"
    xmlns:app="http://schemas.android.com/apk/res-auto"
    android:orientation="horizontal"
    tools:context=".MainActivity">

    <Button
        android:id="@+id/button0"
        android:layout_width="match_parent"
        android:layout_height="match_parent"
        app:layout_constraintTop_toTopOf="parent"
        app:layout_constraintBottom_toBottomOf="parent"
        app:layout_constraintEnd_toEndOf="parent"
        app:layout_constraintStart_toStartOf="parent"
        android:text="Button 0"/>

</androidx.constraintlayout.widget.ConstraintLayout>

# 다른 자식 뷰와의 제약 조건
다음 속성을 사용하면 다른 뷰와의 제약 조건을 추가할 수 있습니다.
| 뷰 이름 | 설명 |
|---|---|
app:layout_constraintLeft_toRightOf | 현재 뷰 왼쪽과 다른 뷰의 오른쪽 사이에 제약조건을 추가 |
app:layout_constraintRight_toLeftOf | 현재 뷰 오른쪽과 다른 뷰 왼쪽 사이에 제약조건을 추가 |
app:layout_constraintTop_toBottomOf | 현재 뷰 위쪽과 다른 뷰 아래쪽 사이에 제약조건을 추가 |
app:layout_constraintBottom_toTopOf | 현재 뷰 아래쪽과 다른 뷰 위쪽 사이에 제약조건을 추가 |
예제를 살펴봅시다. Button 0이 다음과 같이 배치되어있습니다.
<?xml version="1.0" encoding="utf-8"?>
<androidx.constraintlayout.widget.ConstraintLayout xmlns:android="http://schemas.android.com/apk/res/android"
    xmlns:tools="http://schemas.android.com/tools"
    android:layout_width="match_parent"
    android:layout_height="match_parent"
    xmlns:app="http://schemas.android.com/apk/res-auto"
    android:orientation="horizontal"
    tools:context=".MainActivity">

    <Button
        android:id="@+id/button0"
        android:layout_width="wrap_content"
        android:layout_height="wrap_content"
        android:text="Button 0"
        app:layout_constraintTop_toTopOf="parent"
        app:layout_constraintStart_toStartOf="parent"/>

</androidx.constraintlayout.widget.ConstraintLayout>

이제 Button 1는 Button 0의 아래에, Button 2는 Button 0의 오른쪽에 배치하겠습니다.
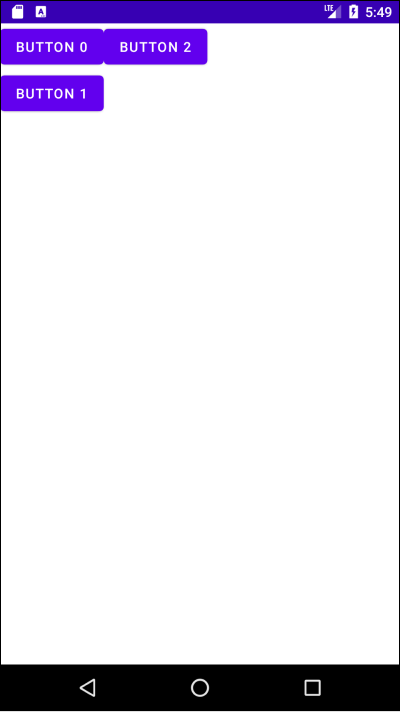
제약조건을 다음과 같이 설정하면 됩니다.
<?xml version="1.0" encoding="utf-8"?>
<androidx.constraintlayout.widget.ConstraintLayout xmlns:android="http://schemas.android.com/apk/res/android"
    xmlns:tools="http://schemas.android.com/tools"
    android:layout_width="match_parent"
    android:layout_height="match_parent"
    xmlns:app="http://schemas.android.com/apk/res-auto"
    android:orientation="horizontal"
    tools:context=".MainActivity">

    <Button
        android:id="@+id/button0"
        android:layout_width="wrap_content"
        android:layout_height="wrap_content"
        android:text="Button 0"
        app:layout_constraintTop_toTopOf="parent"
        app:layout_constraintStart_toStartOf="parent"/>

    <Button
        android:id="@+id/button1"
        android:layout_width="wrap_content"
        android:layout_height="wrap_content"
        android:text="Button 1"
        app:layout_constraintTop_toBottomOf="@+id/button0"
        app:layout_constraintStart_toStartOf="parent"/>

    <Button
        android:id="@+id/button2"
        android:layout_width="wrap_content"
        android:layout_height="wrap_content"
        android:text="Button 2"
        app:layout_constraintStart_toEndOf="@+id/button0"
        app:layout_constraintTop_toTopOf="parent"/>

</androidx.constraintlayout.widget.ConstraintLayout>
# 체이닝(Chaining)
한 방향으로 모든 요소의 제약조건이 설정되어있을 때를 체이닝(Chaining)이라고 합니다. 예제를 살펴봅시다.
<?xml version="1.0" encoding="utf-8"?>
<androidx.constraintlayout.widget.ConstraintLayout xmlns:android="http://schemas.android.com/apk/res/android"
    xmlns:tools="http://schemas.android.com/tools"
    android:layout_width="match_parent"
    android:layout_height="match_parent"
    xmlns:app="http://schemas.android.com/apk/res-auto"
    android:orientation="horizontal"
    tools:context=".MainActivity">

    <Button
        android:id="@+id/button1"
        android:layout_width="wrap_content"
        android:layout_height="wrap_content"
        android:text="Button 1"
        app:layout_constraintTop_toTopOf="parent"
        app:layout_constraintStart_toStartOf="parent"
        app:layout_constraintEnd_toStartOf="@+id/button2"
        app:layout_constraintHorizontal_chainStyle="spread_inside"/>

    <Button
        android:id="@+id/button2"
        android:layout_width="wrap_content"
        android:layout_height="wrap_content"
        android:text="Button 2"
        app:layout_constraintStart_toEndOf="@+id/button1"
        app:layout_constraintTop_toTopOf="parent"
        app:layout_constraintEnd_toStartOf="@+id/button3"/>

    <Button
        android:id="@+id/button3"
        android:layout_width="wrap_content"
        android:layout_height="wrap_content"
        android:text="Button 3"
        app:layout_constraintStart_toEndOf="@+id/button2"
        app:layout_constraintTop_toTopOf="parent"
        app:layout_constraintEnd_toEndOf="parent" />

</androidx.constraintlayout.widget.ConstraintLayout>
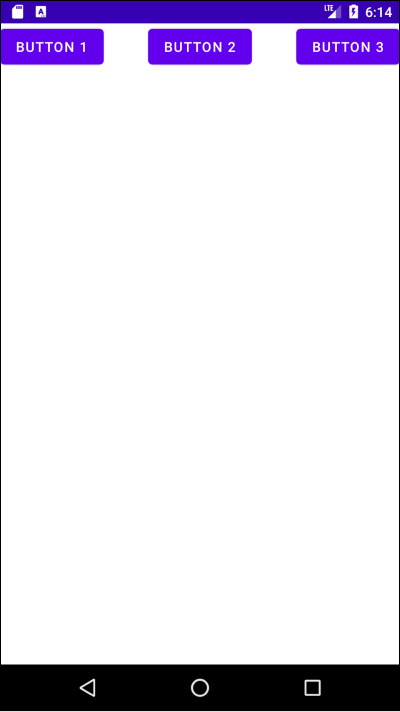
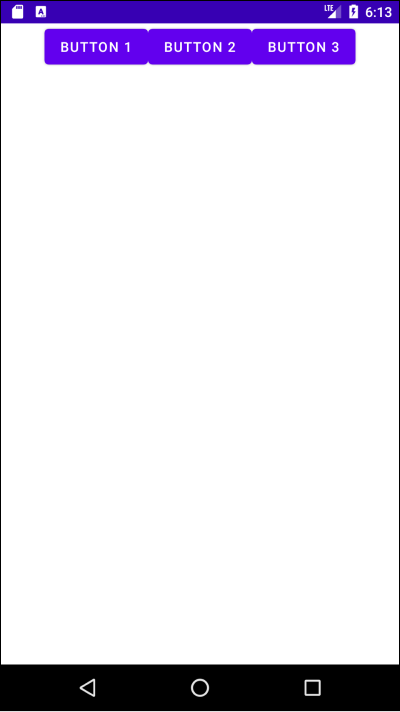
위 예제는 아래 그림과 같이 제약조건이 설정되어있으며, 가로축 방향으로 체이닝(Chaining)이 설정되어있다고 합니다.

가로축 방향의 체이닝에서는 가장 왼쪽 요소를, 세로축 방향의 체이닉에서는 가장 위쪽 요소를 헤드(Head)라고 합니다.

헤드(Head)요소에서 layout_constraintHorizontal_chainStyle 또는 layout_constraintVertical_chainStyle 속성으로 요소들의 배치 방법을 설정할 수 있습니다.
app:layout_constraintHorizontal_chainStyle="packed"로 설정하면 다음과 같이 배치됩니다.
<?xml version="1.0" encoding="utf-8"?>
<androidx.constraintlayout.widget.ConstraintLayout xmlns:android="http://schemas.android.com/apk/res/android"
    xmlns:tools="http://schemas.android.com/tools"
    android:layout_width="match_parent"
    android:layout_height="match_parent"
    xmlns:app="http://schemas.android.com/apk/res-auto"
    android:orientation="horizontal"
    tools:context=".MainActivity">

    <Button
        android:id="@+id/button1"
        android:layout_width="wrap_content"
        android:layout_height="wrap_content"
        android:text="Button 1"
        app:layout_constraintTop_toTopOf="parent"
        app:layout_constraintStart_toStartOf="parent"
        app:layout_constraintEnd_toStartOf="@+id/button2"
        app:layout_constraintHorizontal_chainStyle="packed"/>

    <Button
        android:id="@+id/button2"
        android:layout_width="wrap_content"
        android:layout_height="wrap_content"
        android:text="Button 2"
        app:layout_constraintStart_toEndOf="@+id/button1"
        app:layout_constraintTop_toTopOf="parent"
        app:layout_constraintEnd_toStartOf="@+id/button3"/>

    <Button
        android:id="@+id/button3"
        android:layout_width="wrap_content"
        android:layout_height="wrap_content"
        android:text="Button 3"
        app:layout_constraintStart_toEndOf="@+id/button2"
        app:layout_constraintTop_toTopOf="parent"
        app:layout_constraintEnd_toEndOf="parent" />

</androidx.constraintlayout.widget.ConstraintLayout>
app:layout_constraintHorizontal_chainStyle="spread"로 설정하면 다음과 같이 배치됩니다.
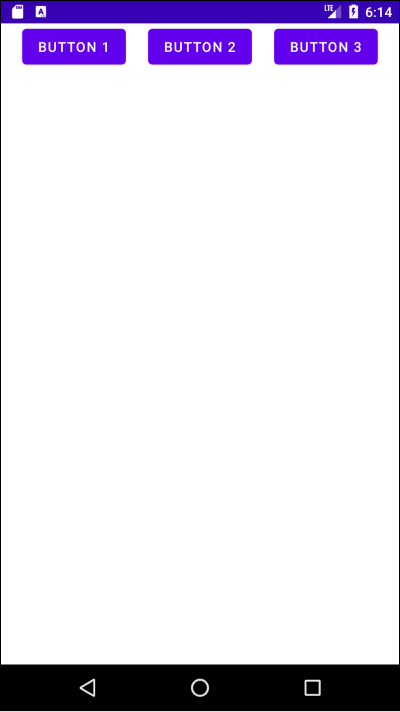
app:layout_constraintHorizontal_chainStyle="spread_inside"로 설정하면 다음과 같이 배치됩니다.