# Table of Contents
# 입출력
애플리케이션에서는 외부에서 데이터를 읽어오거나 외부로 데이터를 보내는 작업이 빈번하게 일어난다. 외부에서 애플리케이션으로 데이터를 읽어오는 것을 입력(Input), 애플리케이션에서 외부로 데이터를 내보내는 것을 출력(Output)이라고 한다.
입력
- 사용자로부터 키보드, 마우스 등으로 데이터를 받아옴
- 파일에서 데이터를 읽어옴
- 네트워크를 통해 데이터를 읽어옴
출력
- 모니터에 데이터를 출력하여 보여줌
- 파일에 데이터를 출력하여 저장함
Java에서는 입출력을 위한 요소들이 java.io 패키지에 포함되어있다. 이 패키지는 입출력을 위한 세 가지 방법을 제공한다.
- InputStream, OutputStream
- Reader, Writer
- Scanner
# InputStream, OutputStream
InputStream과 OutputStream은 byte 타입(8bit) 단위로 데이터를 입출력한다. 문자 뿐만 아니라 이미지, 멀티미디어 등 모든 종류의 데이터를 바이트 단위로 주고받을 수 있다.
InputStream과 OutputStream은 인터페이스며 대표적인 구현체는 다음과 같다.
- ByteArrayInputStream, ByteArrayOutputStream (기반 스트림)
- FileInputStream, FileOutputStream (기반 스트림)
- BufferedInputStream, BufferedOutputStream (보조 스트림)
- DataInputStream, DataOutputStream (보조 스트림)
- ObjectInputStream, ObjectOutputStream (보조 스트림)
# ByteArrayInputStream, ByteArrayOutputStream
ByteArrayInputStream, ByteArrayOutputStream는 메모리, 즉 바이트 배열을 대상으로 입출력을 한다.
public class App {

    public static void main(String[] args) {
        byte[] src = {0, 1, 2, 3, 4, 5, 6, 7, 8};
        byte[] des = null;

        ByteArrayInputStream inputStream = new ByteArrayInputStream(src);
        ByteArrayOutputStream outputStream = new ByteArrayOutputStream();

        int data = 0;

        // 바이트 배열 src에서 한 바이트 씩 읽어서
        while((data = inputStream.read()) != -1) {
            // 스트림에 저장한 후
            outputStream.write(data);
        }

        // 스트림을 바이트 배열로 변환한다.
        des = outputStream.toByteArray();

        System.out.println(Arrays.toString(src));   // [0, 1, 2, 3, 4, 5, 6, 7, 8]
        System.out.println(Arrays.toString(des));   // [0, 1, 2, 3, 4, 5, 6, 7, 8]
    }
}
# FileInputStream, FileOutputStream
FileInputStream, FileOutputStream은 파일에 입출력할 때 사용한다.
FileInputStream 예제를 살펴보자. 이 예제는 이미지 파일을 애플리케이션으로 읽어온다. FileInputStream.read()를 사용하면 한 바이트를 읽어오며, 더 이상 읽을 바이트가 없으면 -1을 반환한다.
public class App {

    public static void main(String[] args) {

        String sourcePath = null;
        InputStream inputStream = null;

        int data = 0;

        try {
            sourcePath = "/Users/yologger/Desktop/folder" + File.separator + "avatar.gif";
            inputStream = new FileInputStream(sourcePath);

            while((data = inputStream.read()) != -1) {
                System.out.println(data);
            }

        } catch(IOException e) {
            e.printStackTrace();
        } finally {
            try {
                inputStream.close();
            } catch (IOException e) {
                e.printStackTrace();
            }
        }
    }
}
FileOutputStream 예제를 살펴보자. 이 예제는 읽어온 이미지 파일을 다른 이름으로 디렉토리에 복사하고있다. FileOutputStream.write() 메소드는 한 바이트를 출력한다.
import java.io.*;

public class App {

    public static void main(String[] args) {

        String sourcePath = null;
        InputStream inputStream = null;

        String destinationPath = null;
        OutputStream outputStream = null;

        int data = 0;

        try {
            sourcePath = "/Users/yologger/Desktop/folder" + File.separator + "avatar.gif";
            inputStream = new FileInputStream(sourcePath);

            destinationPath = "/Users/yologger/Desktop/folder" + File.separator + "copy.gif";
            outputStream =  new FileOutputStream(destinationPath);

            while((data = inputStream.read()) != -1) {
                outputStream.write(data);
            }

        } catch(IOException e) {
            e.printStackTrace();
        } finally {
            try {
                inputStream.close();
                outputStream.close();
            } catch (IOException e) {
                e.printStackTrace();
            }
        }
    }
}
# BufferedInputStream, BufferedOutputStream
BufferedInputStream, BufferedOutputStream는 보조 스트림으로 버퍼 단위로 입출력하기 때문에 훨씬 효율적인 입출력이 가능하다. 보조 스트림은 기반 스트림을 감싸는 형태로 사용한다.
public static void main(String[] args) {

    String sourcePath = null;
    InputStream inputStream = null;
    BufferedInputStream bufferedInputStream = null;

    String destinationPath = null;
    OutputStream outputStream = null;
    BufferedOutputStream bufferedOutputStream = null;

    int data = 0;

    try {
        sourcePath = "/Users/yologger/Desktop/folder" + File.separator + "a.png";
        inputStream = new FileInputStream(sourcePath);
        bufferedInputStream = new BufferedInputStream(inputStream);

        destinationPath = "/Users/yologger/Desktop/folder" + File.separator + "c.png";
        outputStream =  new FileOutputStream(destinationPath);
        bufferedOutputStream = new BufferedOutputStream(outputStream, 16);  // 버퍼로 몇 바이트를 사용할 것인지 지정

        while((data = bufferedInputStream.read()) != -1) {
            bufferedOutputStream.write(data);
        }

    } catch(IOException e) {
        e.printStackTrace();
    } finally {
        try {
            inputStream.close();
            outputStream.close();
        } catch (IOException e) {
            e.printStackTrace();
        }
    }
}
# DataInputStream, DataOutputStream
DataInputStream, DataOutputStream 또한 보조 스트림으로 Java의 원시 타입 단위로 입출력할 수 있다.
import java.io.*;

public class App {

    public static void main(String[] args) {

        FileOutputStream fos = null;
        DataOutputStream dos = null;

        FileInputStream fis = null;
        DataInputStream dis = null;

        try {
            String path = "/Users/yologger/Desktop/folder" + File.separator + "store.txt";

            // Write
            fos = new FileOutputStream(path);
            dos = new DataOutputStream(fos);

            dos.writeInt(3);
            dos.writeDouble(183.2);
            dos.writeChar('a');
            dos.writeUTF("Hello World.");

            // Read
            fis = new FileInputStream(path);
            dis = new DataInputStream(fis);

            System.out.println(dis.readInt());      // 3
            System.out.println(dis.readDouble());   // 183.2
            System.out.println(dis.readChar());     // a
            System.out.println(dis.readUTF());      // Hello World.


        } catch (IOException e) {
            e.printStackTrace();
        } finally {
            try {
                dos.close();
                fos.close();
                dis.close();
                fis.close();
            } catch (IOException e) {
                e.printStackTrace();
            }
        }
    }
}
# 직렬화
운영체제나 네트워크에는 Java의 객체의 개념이 없다. 그렇다면 어떻게 객체를 운영체제의 파일 시스템에 저장하거나 네트워크로 전송할 수 있을까?
직렬화(Serialization)는 객체를 바이트 배열로 변환하여 저장하는 것을 의미한다. 역직렬화(Deserialization)는 바이트 배열을 다시 객체로 변환하는 것이다.
# Serializable
직렬화할 클래스는 Serializable를 구현해야한다.
class Person implements Serializable {

    private String name;
    private String nation;
    private int age;

    public Person(String name, String nation, int age) {
        this.name = name;
        this.nation = nation;
        this.age = age;
    }

    public String getName() {
        return name;
    }

    public void setName(String name) {
        this.name = name;
    }

    public String getNation() {
        return nation;
    }

    public void setNation(String nation) {
        this.nation = nation;
    }

    public int getAge() {
        return age;
    }

    public void setAge(int age) {
        this.age = age;
    }
}
# ObjectInputStream, ObjectOutputStream
직렬화와 역직렬화에는 보통 ObjectInputStream, ObjectOutputStream을 사용한다. 두 스트림 모두 보조 스트림이다.
import java.io.*;

public class App {

    public static void main(String[] args) {

        FileOutputStream fos = null;
        ObjectOutputStream oos = null;

        FileInputStream fis = null;
        ObjectInputStream ois = null;

        Person original = new Person("Ronaldo", "Portugal", 37);

        try {
            String path = "/Users/yologger/Desktop/folder" + File.separator + "store.txt";

            fos = new FileOutputStream(path);
            oos = new ObjectOutputStream(fos);
            oos.writeObject(original);

            fis = new FileInputStream(path);
            ois = new ObjectInputStream(fis);

            Person result = (Person) ois.readObject();

            System.out.println(result.getName());   // Ronaldo
            System.out.println(result.getNation()); // Portugal
            System.out.println(result.getAge());    // 37

        } catch (IOException | ClassNotFoundException e) {
            e.printStackTrace();
        } finally {
            try {
                oos.close();
                fos.close();
                ois.close();
                fis.close();
            } catch(IOException e) {
                e.printStackTrace();
            }
        }
    }
}
ObjectOutputStream의 writeObject() 메소드로 객체를 출력할 수 있다. ObjectInputStream의 readObject()메소드로 객체를 입력할 수 있다.
# transient
멤버변수에 transient을 붙이면 직렬화 대상에서 제외된다.
class Person implements Serializable{

    private String name;
    transient private String nation;
    private int age;

    // ...
}
transient가 붙은 멤버변수를 역직렬화하면 값이 null이 된다.
System.out.println(result.getName());   // Ronaldo
System.out.println(result.getNation()); // null
System.out.println(result.getAge());    // 37
# 표준 입출력 스트림
표준 입출력 스트림은 개발자가 스트림을 생성하지 않아도 시스템이 제공하는 스트림이다. System.in은 키보드에서 1바이트 단위로 입력받는 입력 스트림이며, System.out은 1바이트 단위로 모니터에 출력하는 출력 스트림이다.
public class App {

    public static void main(String[] args) {

        try {
            int data = 0;

            while((data = System.in.read()) != -1) {
                System.out.println((char)data);
            }
        } catch (IOException e) {
            e.printStackTrace();
        }
    }
}
# Reader, Writer
Reader와 Writer는 char 타입(2byte) 단위 입출력에 사용된다. 이 클래스들은 인터페이스며 대표적인 구현체들은 다음과 같다.
- FileReader, FileWriter (기반 스트림)
- BufferedReader, BufferedWriter (보조 스트림)
- InputStreamReader, OutputStreamWriter (보조 스트림)
# FileReader, FileWriter
FileReader, FileWriter는 기반 스트림으로 파일에서 문자 단위로 입출력하는데 사용한다.
public class App {

    public static void main(String[] args) {

        String sourcePath = null;
        FileReader fileReader = null;

        String destinationPath = null;
        FileWriter fileWriter = null;

        try {
            sourcePath = "/Users/yologger/Desktop/folder" + File.separator + "source.txt";
            fileReader = new FileReader(sourcePath);

            destinationPath = "/Users/yologger/Desktop/folder" + File.separator + "copy.txt";
            fileWriter = new FileWriter(destinationPath);

            int data = 0;
            while ((data = fileReader.read()) != -1) {
                // System.out.print((char) data);
                fileWriter.write((char) data);
            }
            fileWriter.flush();

        } catch(IOException e) {
            e.printStackTrace();
        } finally {
            try {
                fileReader.close();
                fileWriter.close();
            } catch (IOException e) {
                e.printStackTrace();
            }
        }
    }
}
public class App {

    public static void main(String[] args) {
        String destinationPath = null;
        FileWriter fileWriter = null;

        try {
            destinationPath = "/Users/yologger/Desktop/folder" + File.separator + "destination.txt";
            fileWriter = new FileWriter(destinationPath);

            fileWriter.write("Ronaldo\n");
            fileWriter.write("Kane\n");
            fileWriter.write("Benzema\n");
            fileWriter.flush();

        } catch(IOException e) {
            e.printStackTrace();
        } finally {
            try {
                fileWriter.close();
            } catch (IOException e) {
                e.printStackTrace();
            }
        }
    }
}
# BufferedReader, BufferedWriter
BufferedReader, BufferedWriter는 보조 스트림으로 버퍼를 사용해서 입출력 효율을 높혀준다.
public class App {

    public static void main(String[] args) {
        String destinationPath = null;
        FileWriter fileWriter = null;
        BufferedWriter bufferedWriter = null;
        FileReader fileReader = null;
        BufferedReader bufferedReader = null;

        try {
            destinationPath = "/Users/yologger/Desktop/folder" + File.separator + "destination.txt";
            fileWriter = new FileWriter(destinationPath);
            bufferedWriter = new BufferedWriter(fileWriter);

            bufferedWriter.write("Ronaldo");
            bufferedWriter.newLine();
            bufferedWriter.write("Kane");
            bufferedWriter.newLine();
            bufferedWriter.write("Benzema");
            bufferedWriter.newLine();
            bufferedWriter.flush();

            fileReader = new FileReader(destinationPath);
            bufferedReader = new BufferedReader(fileReader);

            String data;
            while((data = bufferedReader.readLine()) != null) {
                System.out.println(data);
            }
        } catch(IOException e) {
            e.printStackTrace();
        } finally {
            try {
                fileWriter.close();
            } catch (IOException e) {
                e.printStackTrace();
            }
        }
    }
}
BufferedWriter는 newLine()이라는 줄 바꿈 메서드를 지원한다. 또한 BufferedReader의 readLine() 메서드를 사용하면 라인 단위로 데이터를 읽어올 수 있다.
# InputStreamReader, OutputStreamReader
표준 입출력을 위해 시스템이 제공하는 스트림은 System.in, System.out이다. 이 두 스트림은 1 byte 단위로 데이터를 읽고 쓰기 때문에 char 단위로 데이터를 입출력하기 위해서는 InputStreamReader, OutputStreamReader을 사용해야한다.
public class App {

    public static void main(String[] args) throws IOException {
        InputStreamReader reader = new InputStreamReader(System.in);
        OutputStreamWriter writer = new OutputStreamWriter(System.out);
        int data = 0;
        while((data = reader.read()) != -1) {
            writer.write(data);
            writer.flush();
        }
    }
}
보통 키보드로 데이터를 입력받을 때 다음과 같이 BufferedReader로 한번 더 감싸서 사용한다.
public class App {

    public static void main(String[] args) throws IOException {
        BufferedReader br = new BufferedReader(new InputStreamReader(System.in));
        String input = br.readLine();
        System.out.println(input);
    }
}
# Scanner
Scanner클래스를 사용하면 기본 자료형을 키보드에서 입력받을 수 있다.
# 기본자료형 입력받기
import java.util.Scanner;
public class App {
public static void main(String[] args) {
Scanner in = new Scanner(System.in);
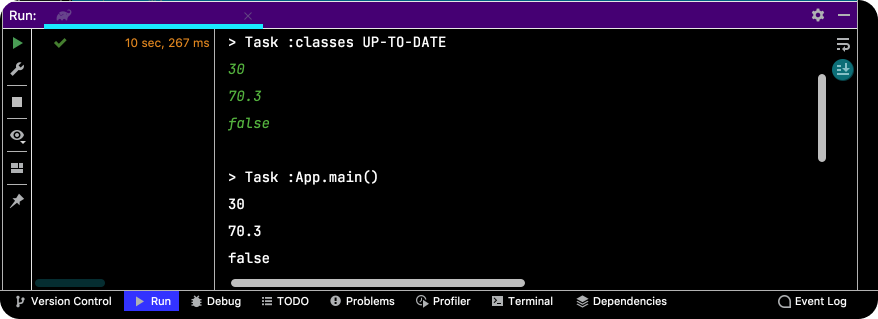
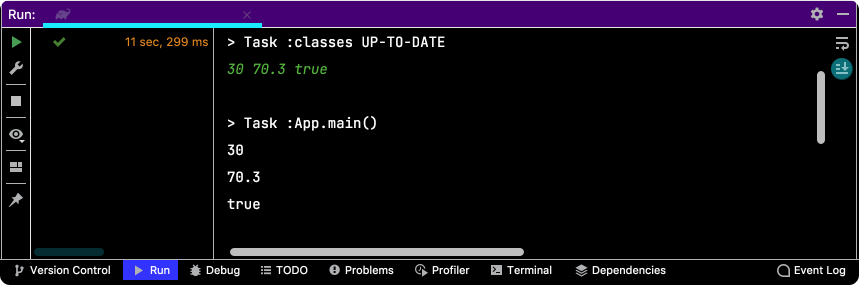
int age = in.nextInt();
Double weight = in.nextDouble();
boolean isMarried = in.nextBoolean();
System.out.println(age); // 30
System.out.println(weight); // 70.5
System.out.println(isMarried); // true
}
}
nextXXX()메소드는 공백(띄어쓰기) 또는 개행문자(줄바꿈)를 기준으로 데이터를 읽어들인다.

# 문자열 입력받기
문자열은 next() 또는 nextLine()을 통해 입력받을 수 있다.
next(): 공백(띄어쓰기) 또는 개행문자(줄바꿈)를 기준으로 문자열을 읽어들인다.nextLine(): 개행문자(줄바꿈)를 기준으로 문자열을 읽어들인다.
# next()
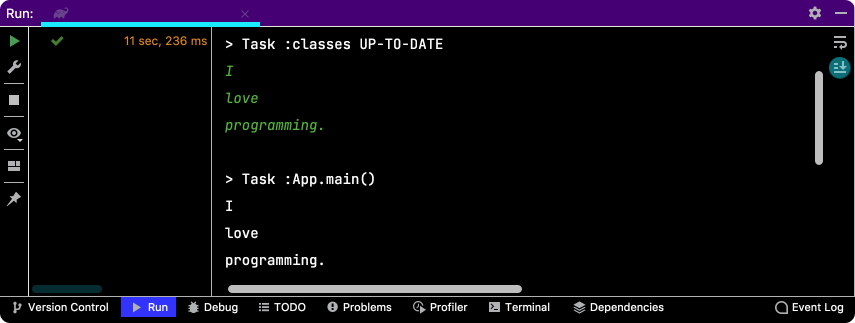
public class App {
    public static void main(String[] args) {

        Scanner in = new Scanner(System.in);

        String str1 = in.nextLine();
        String str2 = in.nextLine();
        String str3 = in.nextLine();

        System.out.println(str1);
        System.out.println(str2);
        System.out.println(str3);
    }
}
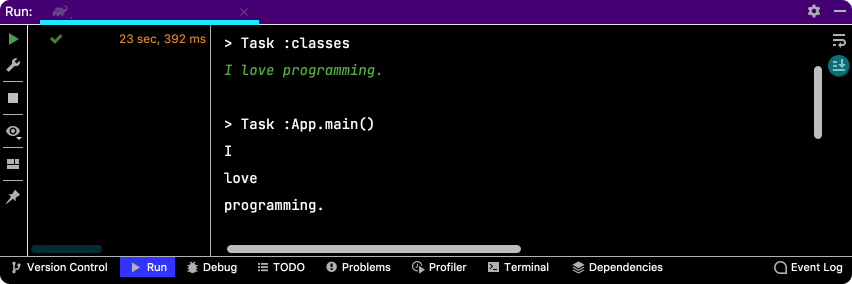
# nextLine()
public class App {
    public static void main(String[] args) {

        Scanner in = new Scanner(System.in);

        String str1 = in.nextLine();

        System.out.println(str1);
    }
}

# Scanner 장단점
Scanner는 Stream, Reader, Writer에 비해 쉬운 입출력이 가능하다. 그러나 버퍼 기능이 제공되지 않아 성능이 느리다.
# File 클래스
File클래스를 사용하면 파일이라 디렉토리를 쉽게 다룰 수 있다.
# 파일 다루기
public class App {

    public static void main(String[] args) {

        String path = "/Users/yologger/Desktop/project" + File.separator + "source.txt";
        File file = new File(path);

        System.out.println(file.getName());
        // source.txt

        System.out.println(file.getAbsolutePath());
        // /Users/yologger/Desktop/project/source.txt

        System.out.println(file.getPath());
        // /Users/yologger/Desktop/project/source.txt

        System.out.println(file.exists());
        // true

        System.out.println(file.isFile());
        // true

        System.out.println(file.isDirectory());
        // false
    }
}
# 디렉토리 다루기
public class App {

    public static void main(String[] args) {

        String path = "/Users/yologger/Desktop/project";
        File file = new File(path);

        System.out.println(file.getName());
        // project

        System.out.println(file.getAbsolutePath());
        // /Users/yologger/Desktop/project

        System.out.println(file.getPath());
        // /Users/yologger/Desktop/project

        System.out.println(file.exists());
        // true

        System.out.println(file.isFile());
        // false

        System.out.println(file.isDirectory());
        // true
    }
}