# Table of Contents
# 오브젝트
쿠버네티스는 자원을 오브젝트(Object)라는 형태로 관리한다. 자주 사용하는 오브젝트는 다음과 같다.
PodReplicaSetDeploymentConfigmapSecretNamespaceServiceIngress
다음 명령어로 쿠버네티스가 제공하는 모든 오브젝트를 확인할 수 있다.
$ kubectl api-resources
NAME                              SHORTNAMES   APIVERSION                             NAMESPACED   KIND
pods                              po           v1                                     true         Pod
replicasets                       rs           apps/v1                                true         ReplicaSet
services                          svc          v1                                     true         Service
deployments                       deploy       apps/v1                                true         Deployment
configmaps                        cm           v1                                     true         ConfigMap
secrets                                        v1                                     true         Secret
namespaces                        ns           v1                                     false        Namespace
ingresses                         ing          networking.k8s.io/v1                   true         Ingress
....
# YAML Configuration 파일
쿠버네티스틑 YAML 파일에 오브젝트를 선언하고 설정한다. 그리고 kubectl apply <YAML 파일> 명령어로 클러스터를 실행한다.
# Pod
- 쿠버네티스에서는 컨테이너 애플리케이션의 기본 단위를
팟(Pod)이라고 한다. - 팟은 하나 이상의 도커 컨테이너로 구성된다.
하나의 Nginx 컨테이너로 구성된 간단한 팟을 생성해보자. 먼저 nginx-pod.yml파일을 다음과 같이 작성한다.
apiVersion: v1
kind: Pod
metadata:
  name: nginx-pod  # Pod 이름
spec:
  containers:  # Pod에 생성할 컨테이너 나열
    - name: nginx-container  # 컨테이너 이름
      image: nginx:latest  # 컨테이너 이미지
      ports:
      - containerPort: 80
        protocol: TCP
kind: 오브젝트 종류metadata.name: 팟 이름spec: 오브젝트 생성을 위한 상세한 종료spec.containers: 팟에 생성할 컨테이너들을 나열한다.
# 팟 생성 및 실행
kubectl apply -f <YAML 파일> 명령어로 클러스터에서 팟을 실행할 수 있다.
$ kubectl apply -f nginx-pod.yml
pod/nginx-pod created
하나의 도커 컨테이너가 생성된 것도 확인할 수 있다.
$ docker ps -al
ONTAINER ID     IMAGE     COMMAND                  CREATED          STATUS          PORTS     NAMES
fe068fdc944c    nginx     "/docker-entrypoint.…"   24 seconds ago   Up 24 seconds             k8s_nginx-container_nginx-pod_default_e1574fb9-c59e-4916-8bcc-188a5640f6cd_0
YAML 파일에 ---를 명시하여 여러 오브젝트를 선언할 수 있다. 다음 예제는 두 개의 팟을 선언하고 있다.
apiVersion: v1
kind: Pod
metadata:
  name: nginx-pod-1
spec:
  containers:
    - name: nginx-container
      image: nginx:latest
      ports:
      - containerPort: 80
        protocol: TCP
---
apiVersion: v1
kind: Pod
metadata:
  name: nginx-pod-2
spec:
  containers:
    - name: nginx-container
      image: nginx:latest
      ports:
      - containerPort: 80
        protocol: TCP
# 오브젝트 목록 확인
kubectl get <오브젝트 이름> 명령어로 오브젝트 목록을 확인할 수 있다. READY의 1/1은 한 개의 컨테이너 중 한 개의 컨테이너가 정상 실행 중이라는 의미다.
$ kubectl get pods
NAME        READY   STATUS    RESTARTS   AGE
nginx-pod   1/1     Running   0          3m
-o wide 옵션으로 클러스터 내부에서 팟에 할당된 IP도 확인할 수 있다.
$ kubectl get pods -o wide
NAME        READY   STATUS    RESTARTS   AGE   IP          NODE             NOMINATED NODE   READINESS GATES
nginx-pod   1/1     Running   0          70m   10.1.0.33   docker-desktop   <none>           <none>
kubectl get all명령어로 모든 오브젝트를 조회할 수 있다.
$ kubectl get all
# 오브젝트 상세정보 확인
kubectl describe <오브젝트 종류> <오브젝트 이름>으로 오브젝트의 상세한 정보를 확인할 수 있다.
$ kubectl describe pods nginx-pod
Name:         nginx-pod
Namespace:    default
Priority:     0
Node:         docker-desktop/192.168.65.4   // 노드 IP
Start Time:   Tue, 19 Apr 2022 14:23:56 +0900
Labels:       <none>
Annotations:  <none>
Status:       Running
IP:           10.1.0.33   // 팟 IP
IPs:
  IP:  10.1.0.33
Containers:
  nginx-container:
    Container ID:   docker://fe068fdc944c8d64e198c6da83eb29d8f97340412679605c6ba15bda710efe31
    Image:          nginx:latest
    Image ID:       docker-pullable://nginx@sha256:2275af0f20d71b293916f1958f8497f987b8d8fd8113df54635f2a5915002bf1
    Port:           80/TCP
    // 생략 ...
# 컨테이너 내부에 접속하기
kubectl exec -it <팟 이름> -c <컨테이너 이름> <사용할 쉘>로 팟 내부 컨테이너에 접속할 수 있다.
$ kubectl exec -it nginx-pod -c nginx-container bash
root@nginx-pod:/#
Nginx가 실행 중인지 확인해보자.
$ curl localhost
<!DOCTYPE html>
<html>
<head>
<title>Welcome to nginx!</title>
<style>
html { color-scheme: light dark; }
body { width: 35em; margin: 0 auto;
font-family: Tahoma, Verdana, Arial, sans-serif; }
</style>
</head>
<body>
<h1>Welcome to nginx!</h1>
<p>If you see this page, the nginx web server is successfully installed and
working. Further configuration is required.</p>

<p>For online documentation and support please refer to
<a href="http://nginx.org/">nginx.org</a>.<br/>
Commercial support is available at
<a href="http://nginx.com/">nginx.com</a>.</p>

<p><em>Thank you for using nginx.</em></p>
</body>
</html>
# 팟 로그 확인하기
kubectl logs nginx-pod 명령어로 팟 로그를 확인할 수 있다.
$ kubectl logs nginx-pod
# 팟 삭제
kubectl delete -f <yml 파일> 명령어로 팟을 삭제할 수 있다.
$ kubectl delete -f nginx-pod.yml
pod "nginx-pod" deleted
# 모든 팟 삭제
kubectl delete pods --all 명령어로 모든 팟을 삭제할 수 있다.
$ kubectl delete pods --all
# Pod vs. Docker container
팟은 여러 컨테이너를 포함할 수도 있다. nginx-pod.yml 파일을 다음과 같이 수정하자.
apiVersion: v1
kind: Pod
metadata:
  name: nginx-pod
spec:
  containers:
    # 첫번째 컨테이너
    - name: nginx-container
      image: nginx:latest
      ports:
      - containerPort: 80
        protocol: TCP

    # 두번째 컨테이너
    - name: ubuntu-container
      image: ubuntu:latest
      command: ["tail"]
      args: ["-f", "/dev/null"]
두 개의 컨테이너가 생성된 것을 확인할 수 있다.
$ kubectl get pods
NAME        READY   STATUS    RESTARTS   AGE
nginx-pod   2/2     Running   0          116s
# ReplicaSet
레플리카셋(ReplicaSet)은 다음 기능을 제공하는 오브젝트다.
- 동일한 팟 여러 개를 쉽게 생성, 관리할 수 있다.
- 지정한 개수의 팟을 항상 유지하기 때문에 특정 팟이 다운되어도 팟을 새롭게 생성하거나 재시작한다.
세 개의 동일한 팟을 유지하는 레플리카셋을 생성해보자. nginx-replicaset.yml을 다음과 같이 작성한다.
# nginx-replicaset.yml
apiVersion: apps/v1
kind: ReplicaSet
metadata:
  name: nginx-replicaset
spec:
  replicas: 3
  selector:
    matchLabels:
      app: nginx-pod-label
  template:
    metadata:
      name: nginx-pod
      labels:
        app: nginx-pod-label
    spec:
      containers:
      - name: nginx
        image: nginx:latest
        ports:
        - containerPort: 80
spec.replicas: 생성할 팟의 수
이제 다음과 같이 레플리카셋을 생성하자.
$ kubectl apply -f nginx-replicaset.yml
세 개의 팟이 생성된 것을 확인할 수 있다.
$ kubectl get pods
NAME                     READY   STATUS    RESTARTS   AGE
nginx-replicaset-6txwh   1/1     Running   0          102s
nginx-replicaset-tvsg6   1/1     Running   0          102s
nginx-replicaset-xc5xt   1/1     Running   0          102s
$ kubectl get replicaset
NAME               DESIRED   CURRENT   READY   AGE
nginx-replicaset   3         3         3       2m25s
레플리카를 다섯 개로 수정하고 kubectl apply -f 명령어를 다시 실행해보자.
$ kubectl get pods
NAME                     READY   STATUS              RESTARTS   AGE
nginx-replicaset-5xltl   1/1     Running             0          4s
nginx-replicaset-nlnsn   1/1     Running             0          4s
nginx-replicaset-6txwh   1/1     Running             0          3m44s
nginx-replicaset-tvsg6   1/1     Running             0          3m44s
nginx-replicaset-xc5xt   1/1     Running             0          3m44s
두 개의 팟이 추가적으로 생성되었다.
# Deployment
디플로이먼트(Deployment)는 서비스와 매우 유사하다. 다만 다음 기능을 추가적으로 제공한다.
- 애플리케이션의 배포와 롤링 업데이트를 지원한다.
- 이전 배포 버전으로 쉽게 롤백할 수 있다.
우선 디플로이먼트를 정의한 간단한 nginx-deployment.yml 파일을 생성하자. 1.10 버전의 nginx를 사용하고 있는 것에 주목하자.
apiVersion: apps/v1
kind: Deployment
metadata:
  name: nginx-deployment
spec:
  replicas: 3
  selector:
    matchLabels:
      app: nginx-pod-label
  template:
    metadata:
      name: nginx-pod
      labels:
        app: nginx-pod-label
    spec:
      containers:
        - name: nginx-container
          image: nginx:1.10
          ports:
          - containerPort: 80
이제 디플로이먼트를 생성하자. 이때 --record 옵션을 추가한다.
$ kubectl apply -f nginx-deployment.yml --record
deployment.apps/nginx-deployment created
디플로이먼트가 생성되었다.
$ kubectl get deployment
NAME               READY   UP-TO-DATE   AVAILABLE   AGE
nginx-deployment   3/3     3            3           116s
하나의 레플리카도 생성되었다.
$ kubectl get replicaset
NAME                          DESIRED   CURRENT   READY   AGE
nginx-deployment-796dd5cd88   3         3         3       3m50s
세 개의 팟도 생성되었다.
$ kubectl get pods
NAME                                READY   STATUS    RESTARTS   AGE
nginx-deployment-796dd5cd88-mnlpc   1/1     Running   0          105s
nginx-deployment-796dd5cd88-nsdlp   1/1     Running   0          105s
nginx-deployment-796dd5cd88-q97dp   1/1     Running   0          105s
지금까지는 디플로이먼트가 레플리카와 다를게 없어보인다. 이제 nginx-deployment.yml 파일에서 nginx의 버전을 1.10에서 1.11로 변경하자.
# 생략 ...
containers:
- name: nginx-container
    # image: nginx: 1.10
    image: nginx: 1.11
    ports:
    - containerPort: 80
그 다음 kubectl apply -f 명령어를 다시 실행한다.
$ kubectl apply -f nginx-deployment.yml --record
팟들이 새롭게 생성된 것을 확인할 수 있다. 쿠버네티스가 각각의 팟들을 새로운 버전으로 롤링 업데이트한 것이다.
$ kubectl get pods
NAME                               READY   STATUS    RESTARTS   AGE
nginx-deployment-664f4c64c-6wxxs   1/1     Running   0          32s
nginx-deployment-664f4c64c-ksdt4   1/1     Running   0          23s
nginx-deployment-664f4c64c-xz7vc   1/1     Running   0          25s
이제 레플리카 셋을 확인해보자. 기존 레플리카셋과 새로운 레플리카셋이 존재한다.
$ kubectl get replicaset
NAME                          DESIRED   CURRENT   READY   AGE
nginx-deployment-664f4c64c    3         3         3       2m59s
nginx-deployment-796dd5cd88   0         0         0       10m
다음 명령어로 이전 버전으로 롤백을 할 수도 있다.
$ kubectl rollout undo deployment nginx-deployment --to-revision=1
deployment.apps/nginx-deployment rolled back
$ kubectl get pods
NAME                                READY   STATUS    RESTARTS   AGE
nginx-deployment-796dd5cd88-gtmjz   1/1     Running   0          12s
nginx-deployment-796dd5cd88-m4v8v   1/1     Running   0          9s
nginx-deployment-796dd5cd88-tnh5j   1/1     Running   0          11s
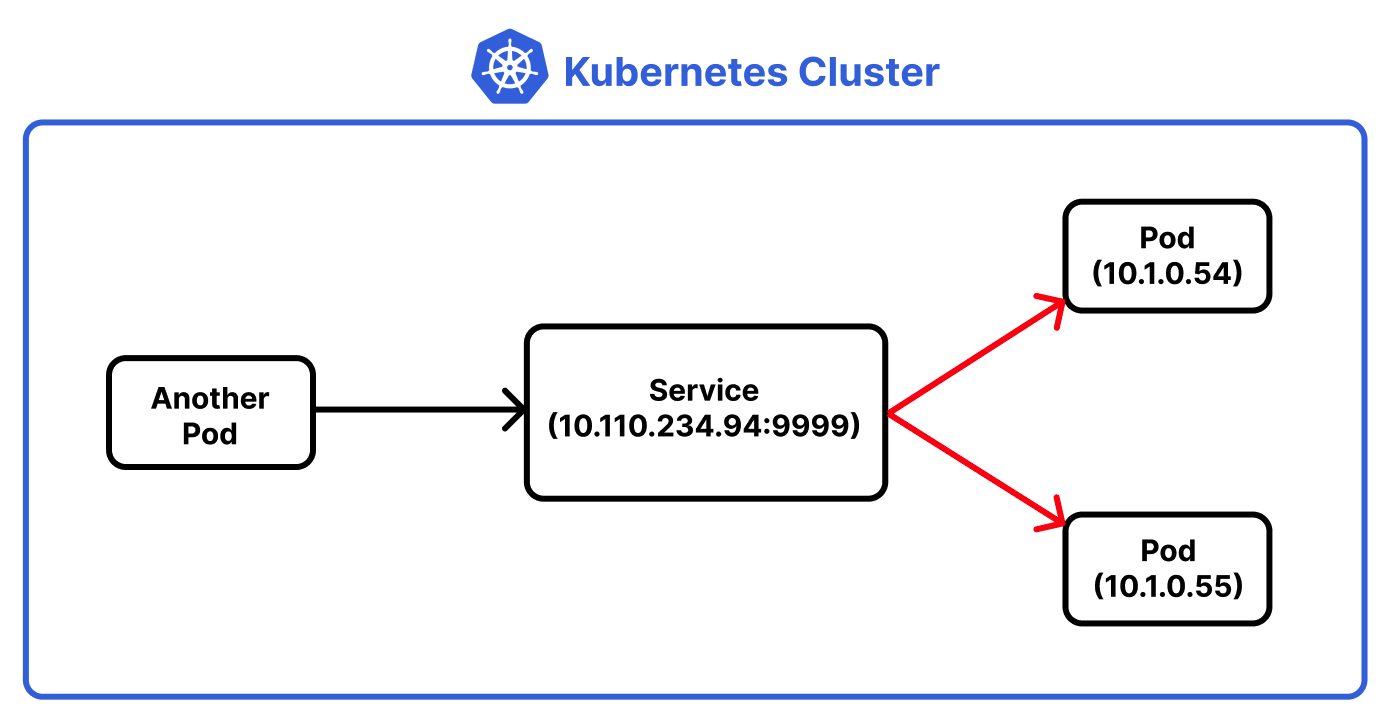
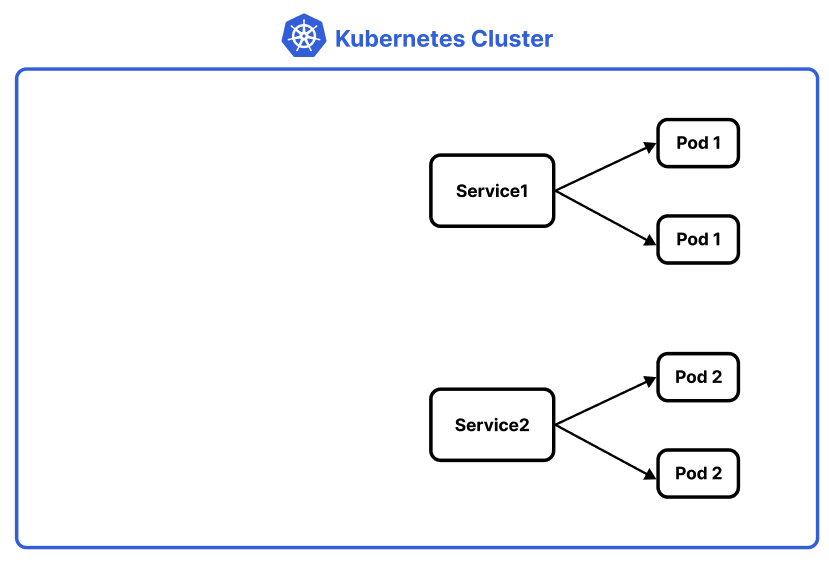
# Service
서비스(Service)는 크게 세 가지 역할을 하는 오브젝트다.
팟 주소 고정: 레플리카셋이나 디플로이먼트로 띄운 팟은 쿠버네티스 클러스터의 상황에 따라서 노드를 옮겨다니기도 하고 재시작되기도 한다. IP 주소가 변하기도 한다. 서비스의셀렉터(Selector), 팟의라벨(Label)를 사용하면 팟이 어떤 노드에 있든 고정된 방법으로 접근할 수 있다.팟 외부 노출: 컨테이너와 쿠버네티스 클러스터의 포트를 바인딩하고 컨테이너 포트를 외부로 노출하는 오브젝트다. 즉 서비스는 클러스터로 들어온 요청을 컨테이너로 포워딩해준다.로드 밸런싱: 요청을 여러 팟으로 분산하여 보낸다.
서비스는 크게 세 가지 타입이 존재한다.
| 종류 | 설명 |
|---|---|
ClusterIP | 쿠버네티스 내부의 팟을 외부로 노출하지 않는 서비스 |
NodePort | 쿠버네티스 내부의 포트를 외부로 노출하는 서비스. 주로 온프레미스 환경에서 사용한다. |
LoadBalancer | AWS, GCP 등 클라우드 서비스에서 사용하는 서비스. 클라우드 서비스가 제공하는 로드밸런서 기능을 사용한다. |
실제 운영 환경에서는 컨테이너 외부 노출 기능은 서비스 대신 인그레스(Ingress)를 사용하여 구축한다. 서비스는 주로 팟 주소 고정와 로드 밸런싱에 사용된다.
# 팟 주소 고정
쿠버네티스는 기본적으로 팟에 유동적으로 IP를 할당한다.
$ kubectl get pods -o wide
NAME                               READY   STATUS    RESTARTS   AGE   IP
nginx-deployment-664f4c64c-4sbfd   1/1     Running   0          6s    10.1.0.54
nginx-deployment-664f4c64c-5r55z   1/1     Running   0          6s    10.1.0.55
위 예제에서의 IP(10.1.0.54, 10.1.0.55)는 쿠버네티스의 상태에 따라 동적으로 변할 수 있다. 따라서 IP가 아닌 다른 고정된 주소로 팟에 접근할 수 있어야 한다.
# 팟의 외부 노출
팟은 기본적으로 외부에 노출되지 않는다. 즉 쿠버네티스 클러스터 내부, 즉 내부 다른 팟에서만 해당 팟과 통신할 수 있다.
이를 살펴보기 위해 두 개의 동일한 팟을 유지하는 디플로이먼트를 실행해보자.
# nginx-deployment.yml
apiVersion: apps/v1
kind: Deployment
metadata:
  name: nginx-deployment
spec:
  replicas: 2
  selector:
    matchLabels:
      app: nginx-pod-label
  template:
    metadata:
      name: nginx-pod
      labels:
        app: nginx-pod-label
    spec:
      containers:
        - name: nginx-container
          image: nginx:latest
          ports:
          - containerPort: 80
$ kubectl apply -f nginx-deployment.yml

$ kubectl get pods -o wide
NAME                               READY   STATUS    RESTARTS   AGE   IP
nginx-deployment-664f4c64c-4sbfd   1/1     Running   0          6s    10.1.0.54
nginx-deployment-664f4c64c-5r55z   1/1     Running   0          6s    10.1.0.55
그 다음 10.1.0.54 팟에 접속하여 10.1.0.55과 통신할 수 있는지 확인해보자.
$ kubectl exec -it nginx-deployment-664f4c64c-4sbfd bash
팟 사이에 정상적으로 통신이 되는 것을 확인할 수 있다.
root@nginx-deployment-664f4c64c-4sbfd:/# curl 10.1.0.55
<!DOCTYPE html>
<html>
<head>
<title>Welcome to nginx!</title>
<style>
html { color-scheme: light dark; }
body { width: 35em; margin: 0 auto;
font-family: Tahoma, Verdana, Arial, sans-serif; }
</style>
</head>
<body>
<h1>Welcome to nginx!</h1>
<p>If you see this page, the nginx web server is successfully installed and
working. Further configuration is required.</p>

<p>For online documentation and support please refer to
<a href="http://nginx.org/">nginx.org</a>.<br/>
Commercial support is available at
<a href="http://nginx.com/">nginx.com</a>.</p>

<p><em>Thank you for using nginx.</em></p>
</body>
</html>
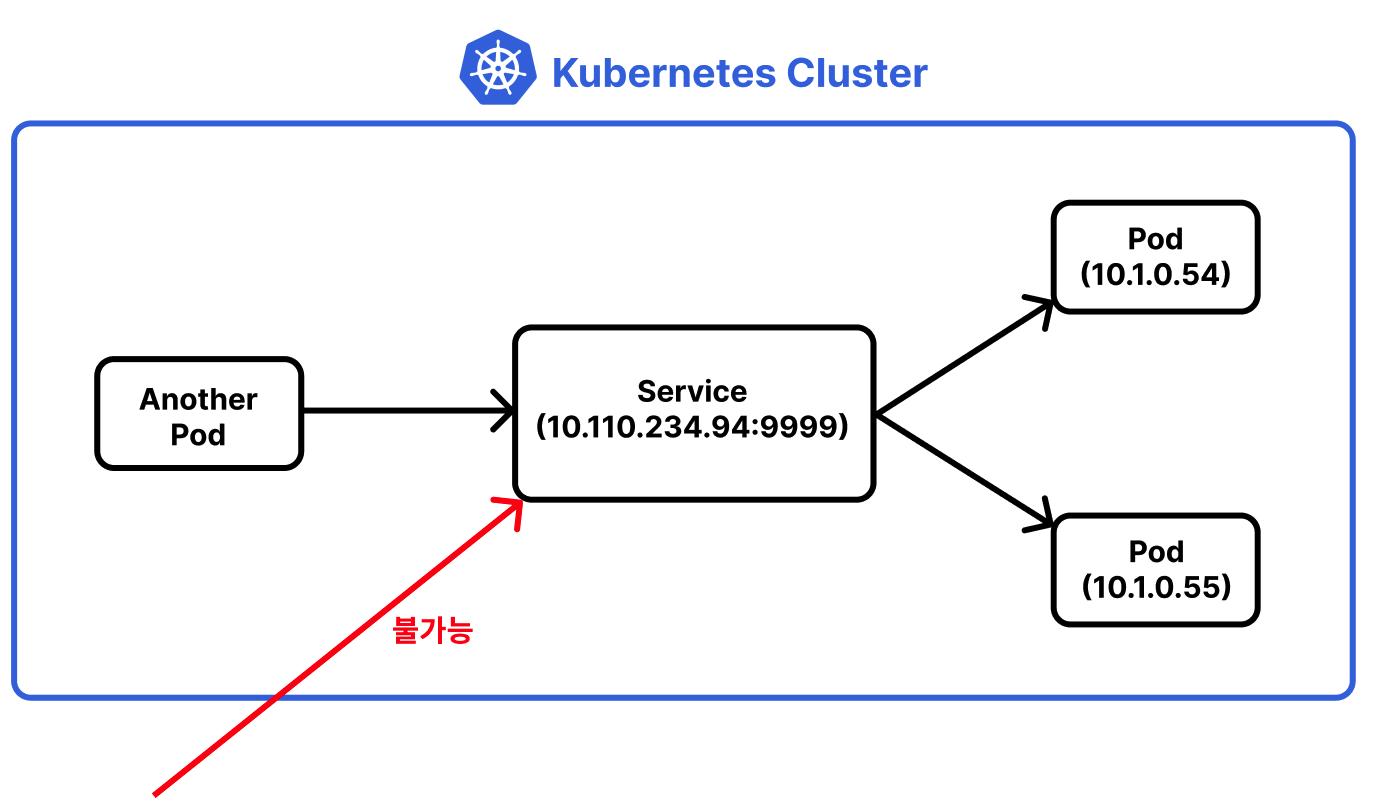
이제 클러스터 외부에서 접근이 안되는지 확인해보자. 쿠버네티스에서는 클러스터를 구성하는 노드 또한 외부로 간주한다. 따라서 호스트OS에서 다음 접속들은 모두 허용되지 않는다.
$ curl 10.1.0.54
$ curl 10.1.0.55
또한 외부 네트워크에서의 접속도 허용되지 않는다.
$ curl <NODE IP>
WARNING
팟을 클러스터 구성하는 노드로 노출하는지는 쿠버네티스의 네트워크 모델에 따라 다르다. 일반적으로 Docker Desktop for Mac OS, Docker Desktop for Window, 온프레미스 모델에서는 클러스터를 구성하는 노드로 조차 포드를 노출하지 않는다. 반면 일부 퍼블릭 클라우드 쿠버네티스는 별다른 설정 없이도 클러스터를 구성하는 노드에게는 포드를 노출하기도 한다. 따라서 기본적으로 클러스터를 구성하는 노드에게 조차 팟을 노출하지 않는다고 간주하는게 좋다.
# ClusterIP 서비스
서비스는 IP가 아닌 셀렉터(Selector)를 사용하여 팟을 식별한다. 서비스는 마치 DNS 처럼 동작하며, IP 대신 팟을 구분하는 라벨(Label)을 사용한다.
서비스 생성을 위한 설정파일은 다음과 같다.
# nginx-service-clusterip.yml
apiVersion: v1
kind: Service
metadata:
  name: nginx-service-clusterip
spec:
  ports:
    - name: nginx-pods-clusterip-port
      port: 9999
      targetPort: 80
  selector:
    app: nginx-pod-label  ## 팟의 라벨
  type: ClusterIP  ## 서비스 타입
서비스를 생성한다.
$ kubectl apply -f nginx-service-clusterip.yml
service/nginx-service-clusterip created
생성된 서비스는 다음과 같다.
$ kubectl get services
NAME                      TYPE        CLUSTER-IP      EXTERNAL-IP   PORT(S)    AGE
kubernetes                ClusterIP   10.96.0.1       <none>        443/TCP    9m47s
nginx-service-clusterip   ClusterIP   10.110.234.94   <none>        9999/TCP   3m30s
이제 다른 팟에서 서비스를 통해 팟들과 통신할 수 있다. 서비스의 CLUSTER-IP와 PORT를 사용하면 된다.
// 다른 팟 내부에 접속
$ kubectl exec -it ubuntu-pod bash
// 다른 팟에서 서비스로 요청
root@ubuntu-pod:/# curl 10.110.234.94:9999
<!DOCTYPE html>
<html>
<head>
<title>Welcome to nginx!</title>
<style>
    body {
        width: 35em;
        margin: 0 auto;
        font-family: Tahoma, Verdana, Arial, sans-serif;
    }
</style>
</head>
<body>
<h1>Welcome to nginx!</h1>
<p>If you see this page, the nginx web server is successfully installed and
working. Further configuration is required.</p>

<p>For online documentation and support please refer to
<a href="http://nginx.org/">nginx.org</a>.<br/>
Commercial support is available at
<a href="http://nginx.com/">nginx.com</a>.</p>

<p><em>Thank you for using nginx.</em></p>
</body>
</html>
서비스로 요청을 보내면 로드밸런싱도 수행된다.
ClusterIP 타입의 서비스는 팟을 외부로 노출하지 않기 때문에 클러스터 외부 네트워크에서는 접근할 수 없다.
# NodePort 서비스
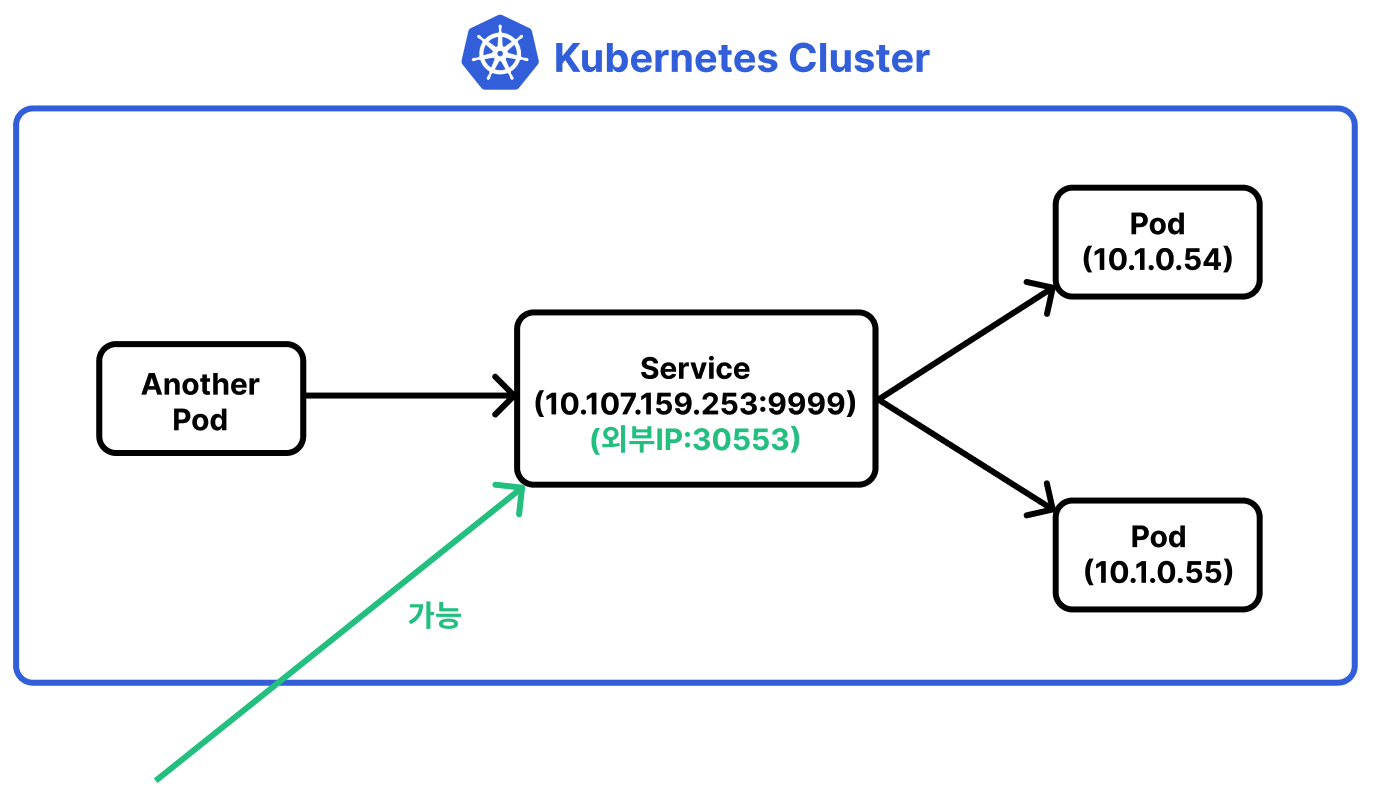
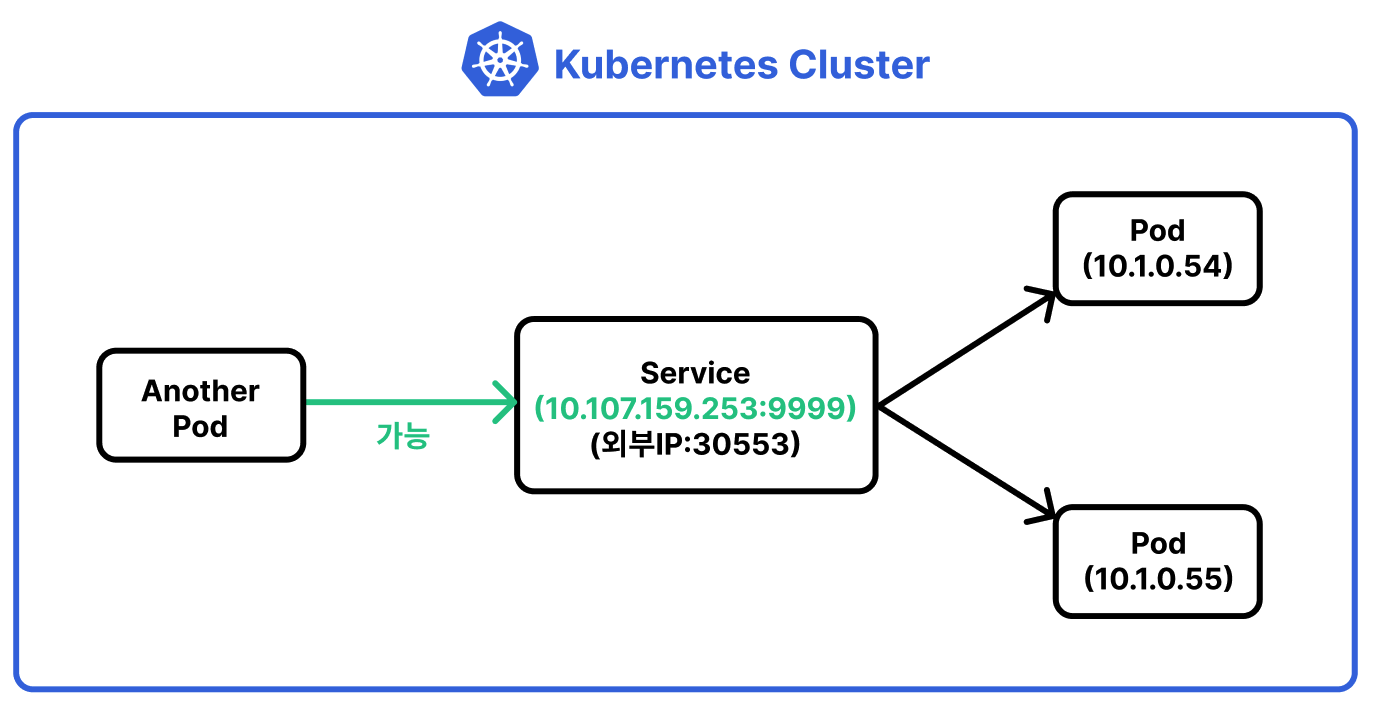
NodePort 타입 서비스는 ClusterIP와 유사하다. 다만 외부 네트워크에서도 팟에 접근하도록 팟을 외부에 노출한다.
# nginx-service-nodeport.yml
apiVersion: v1
kind: Service
metadata:
  name: nginx-service-nodeport
spec:
  ports:
    - name: nginx-pods-port
      port: 9999
      targetPort: 80
  selector:
    app: nginx-pod-label
  type: NodePort
서비스를 생성하자.
$ kubectl apply -f nginx-service-nodeport.yml
생성된 서비스는 다음과 같다.
$ kubectl get services
NAME                      TYPE        CLUSTER-IP       EXTERNAL-IP   PORT(S)          AGE
kubernetes                ClusterIP   10.96.0.1        <none>        443/TCP          49s
nginx-service-clusterip   NodePort    10.107.159.253   <none>        9999:30553/TCP   34s
클러스터 내부에서 사용되는 9999 포트 외에도 30553라는 포트가 생성됐다. 30553 포트는 외부 네트워크로 노출되는 포트이며, 외부 네트워크에서 팟과 통신할 수 있다.
$ curl <워커노드 PUBLIC IP>:30553
Info
AWS EC2에서 쿠버네티스를 구축한 경우 보안 그룹에서 해당 포트를 개방해야한다.
이제 클러스터의 노드에서도 팟과 통신할 수 있다.
$ curl <워커노드 PUBLIC IP>:30553
<!DOCTYPE html>
<html>
<head>
<title>Welcome to nginx!</title>
<style>
    body {
        width: 35em;
        margin: 0 auto;
        font-family: Tahoma, Verdana, Arial, sans-serif;
    }
</style>
</head>
<body>
<h1>Welcome to nginx!</h1>
<p>If you see this page, the nginx web server is successfully installed and
working. Further configuration is required.</p>

<p>For online documentation and support please refer to
<a href="http://nginx.org/">nginx.org</a>.<br/>
Commercial support is available at
<a href="http://nginx.com/">nginx.com</a>.</p>

<p><em>Thank you for using nginx.</em></p>
</body>
</html>
물론 클러스터 내부 팟에서도 여전히 통신할 수 있다.
// 다른 팟 내부에 접속
$ kubectl exec -it ubuntu-pod bash
// 다른 팟에서 서비스로 요청
root@ubuntu-pod:/# curl 10.107.159.253:9999
<!DOCTYPE html>
<html>
<head>
<title>Welcome to nginx!</title>
<style>
    body {
        width: 35em;
        margin: 0 auto;
        font-family: Tahoma, Verdana, Arial, sans-serif;
    }
</style>
</head>
<body>
<h1>Welcome to nginx!</h1>
<p>If you see this page, the nginx web server is successfully installed and
working. Further configuration is required.</p>

<p>For online documentation and support please refer to
<a href="http://nginx.org/">nginx.org</a>.<br/>
Commercial support is available at
<a href="http://nginx.com/">nginx.com</a>.</p>

<p><em>Thank you for using nginx.</em></p>
</body>
</html>
외부로 노출되는 포트는 기본적으로 30000~32768 포트 중 랜덤하게 선택되지만 원하면 다음과 같이 포트를 지정할 수 있다.
# nginx-service-nodeport.yml
apiVersion: v1
kind: Service
metadata:
  name: nginx-service-nodeport
spec:
  ports:
    - name: nginx-pods-port
      port: 9999
      targetPort: 80
      nodePort: 31000
  selector:
    app: nginx-pod-label
  type: NodePort
# Namespace
네임스페이스(Namespace)를 사용하면 클러스터에서 여러 오브젝트를 논리적으로 구분할 수 있다.
# 네임스페이스 목록 확인
kubectl get namespaces 명령어로 네임스페이스 목록을 확인할 수 있다.
$ kubectl get namespaces
NAME              STATUS   AGE
kube-public       Active   25h
kube-system       Active   25h
default           Active   25h
쿠버네티스는 기본적으로 3개의 네임스페이스를 제공한다. kube-public와 kube-system는 시스템에서 사용하는 네임스페이스다. default는 기본으로 생성되는 네임스페이스로, 오브젝트를 생성할 때 별도의 네임스페이스를 지정하지 않으면 이 네임스페이스에 오브젝트가 생성된다.
# 네임스페이스 생성
다음과 같이 YAML 설정 파일로 네임스페이스를 생성할 수 있다.
# my-namespace.yml
apiVersion: v1
kind: Namespace
metadata:
  name: my-namespace
$ kubectl apply -f my_namespace.yml
kubectl create namespace <네임스페이스 이름> 명령어로도 네임스페이스를 생성할 수 있다.
$ kubectl create namespace your-namespace
2개의 네임스페이스가 생성된 것을 확인할 수 있다.
$ kubectl get namespace
NAME              STATUS   AGE
default           Active   25h
kube-public       Active   25h
kube-system       Active   25h
my-namespace      Active   3m35s
your-namespace    Active   52s
# 네임스페이스에 오브젝트 생성하기
YAML 설정파일에서 metadata.namespace 항목을 다음과 같이 설정하면 된다.
# nginx-pod.yml
apiVersion: v1
kind: Pod
metadata:
  name: nginx-pod
  namespace: my-namespace
spec:
  containers:
    - name: nginx-container
      image: nginx:latest
      ports:
      - containerPort: 80
        protocol: TCP
# 특정 네임스페이스에 포함되는 오브젝트만 조회하기
--all-namespaces 옵션으로 네임스페이스 정보도 함께 출력할 수 있다.
$ kubectl get pods --all-namespaces
NAMESPACE      NAME           READY   STATUS    RESTARTS         AGE
my-namespace   nginx-pod      1/1     Running   0                5m27s
...
-n <네임스페이스 이름> 옵션으로 특정 네임스페이스에 속하는 오브젝트만 조회할 수 있다.
$ kubectl get pods -n my-namespace
NAME        READY   STATUS    RESTARTS   AGE
nginx-pod   1/1     Running   0          7m45s
# 네임스페이스 삭제
kubectl delete namespace <네임스페이스 이름> 명령어로 네임스페이스를 삭제할 수 있다.
$ kubectl create configmap my-configmap
 --from-literal NAME=paul
# Configmap
컨피그맵(Configmap)은 설정값을 저장할 수 있는 오브젝트다. 컨피그맵은 네임스페이스별로 존재한다.
# 컨피그맵 생성
kubectl create configmap <이름> --from-literal <키=값>으로 컨피그맵을 생성할 수 있다.
$ kubectl create configmap my-configmap --from-literal DB_URL=localhost
YAML 설정파일을 사용할 수도 있다.
# your-configmap.yml
apiVersion: v1
kind: ConfigMap
metadata:
  name: your-configmap
data:
  DB_URL: localhost
  DB_USER: myuser
  DB_PASSWORD: mypassword
$ kubectl apply -f your-configmap.yml
# 컨피그맵 확인
kubectl get configmap명령어로 컨피그맵을 확인할 수 있다.
$ kubectl get configmap
NAME               DATA   AGE
my-configmap       1      70s
your-configmap     3      13s
kubectl describe configmap <컨피그맵 이름>으로 컨피그맵의 키-값을 확인할 수 있다.
$ kubectl describe configmap your-configmap
Name:         your-configmap
Namespace:    default
Labels:       <none>
Annotations:  <none>

Data
====
DB_PASSWORD:
----
mypassword
DB_URL:
----
localhost
DB_USER:
----
myuser

BinaryData
====

Events:  <none>
# YAML 설정파일에서 컨피그맵 사용하기
컨피그맵의 키-값은 컨테이너가 생성될 때 환경변수로 추가된다.
이를 확인하기 위해 nginx-pod.yml 파일을 다음과 같이 수정하자.
apiVersion: v1
kind: Pod
metadata:
  name: nginx-pod
spec:
  containers:
    - name: nginx-container
      image: nginx:latest
      envFrom:
      - configMapRef:
          name: your-configmap
      ports:
      - containerPort: 80
        protocol: TCP
그 다음 컨테이너를 생성하자.
$ kubectl apply -f nginx-pod.yml
pod/nginx-pod created
그리고 컨테이너 내부에 접속한다.
$ kubectl exec -it nginx-pod -c nginx-container bash
root@nginx-pod:/#
컨피그맵의 키-값이 컨테이너에 환경변수로 등록된 것을 확인할 수 있다.
root@nginx-pod:/# echo $DB_PASSWORD
mypassword

root@nginx-pod:/# echo $DB_USER
myuser

root@nginx-pod:/# echo $DB_PASSWORD
mypassword
# 컨피그맵 삭제
kubectl delete configmap <컨피그맵 이름> 명령어로 컨피그맵을 삭제할 수 있다.
$ kubectl delete configmap my-configmap
# Secret
시크릿(Secret)은 컨피그맵과 매우 유사하지만 값을 암호화하여 저장한다.
# 시크릿 생성
kubectl create secret generic <시크릿 이름> --from-literal <키=값> 명령어로 시크릿을 생성한다.
$ kubectl create secret generic my-secret --from-literal DB_PASSWORD=1234
시크릿은 YAML 파일로 생성할 수도 있다.
# your-secret.yml
apiVersion: v1
kind: Secret
metadata:
  name: your-secret
stringData:
  DB_URL: localhost
  DB_USER: myuser
  DB_PASSWORD: mypass
$ kubectl apply -f your-secret.yml
# 시크릿 확인
kubectl get secrets명령어로 모든 시크릿을 확인할 수 있다.
$ kubectl get secrets
NAME                  TYPE                                  DATA   AGE
default-token-jsdgt   kubernetes.io/service-account-token   3      26h
my-secret             Opaque                                1      10m
your-secret           Opaque                                3      65s
kubectl describe secret <시크릿 이름> 명령어로 시크릿의 키-값을 확인해보자.
$ kubectl describe secret your-secret
Name:         your-secret
Namespace:    default
Labels:       <none>
Annotations:  <none>

Type:  Opaque

Data
====
DB_PASSWORD:  6 bytes
DB_URL:       9 bytes
DB_USER:      6 bytes
컨피그맵과 다르게 값을 직접 출력하지 않고 바이트 수만을 보여준다. kubectl get secret <시크릿 이름> -o yaml 명령어를 사용하면 저장된 값도 확인할 수 있다.
$ kubectl get secret your-secret -o yaml
apiVersion: v1
data:
  DB_PASSWORD: bXlwYXNz
  DB_URL: bG9jYWxob3N0
  DB_USER: bXl1c2Vy
kind: Secret
metadata:
  annotations:
    kubectl.kubernetes.io/last-applied-configuration: |
      {"apiVersion":"v1","kind":"Secret","metadata":{"annotations":{},"name":"your-secret","namespace":"default"},"stringData":{"DB_PASSWORD":"mypass","DB_URL":"localhost","DB_USER":"myuser"}}
  creationTimestamp: "2022-04-19T11:20:43Z"
  name: your-secret
  namespace: default
  resourceVersion: "54791"
  uid: 069997e5-4ab2-4b7c-9a82-ecbb1abc5521
type: Opaque
시크릿은 값을 base 64로 인코딩하여 저장한다. bXlwYXNz, bG9jYWxob3N0 같이 인코딩된 값이 저장된다.
# YAML 설정파일에서 시크릿 사용하기
시크릿의 키-값 또한 컨테이너가 생성될 때 환경변수로 추가된다.
apiVersion: v1
kind: Pod
metadata:
  name: nginx-pod
spec:
  containers:
    - name: nginx-container
      image: nginx:latest
      envFrom:
      - secretRef:
          name: your-secret
      ports:
      - containerPort: 80
        protocol: TCP
# 시크릿 삭제
kubectl delete secret <시크릿 이름> 명령어로 시크릿을 삭제할 수 있다.
$ kubectl delete secret my-secret
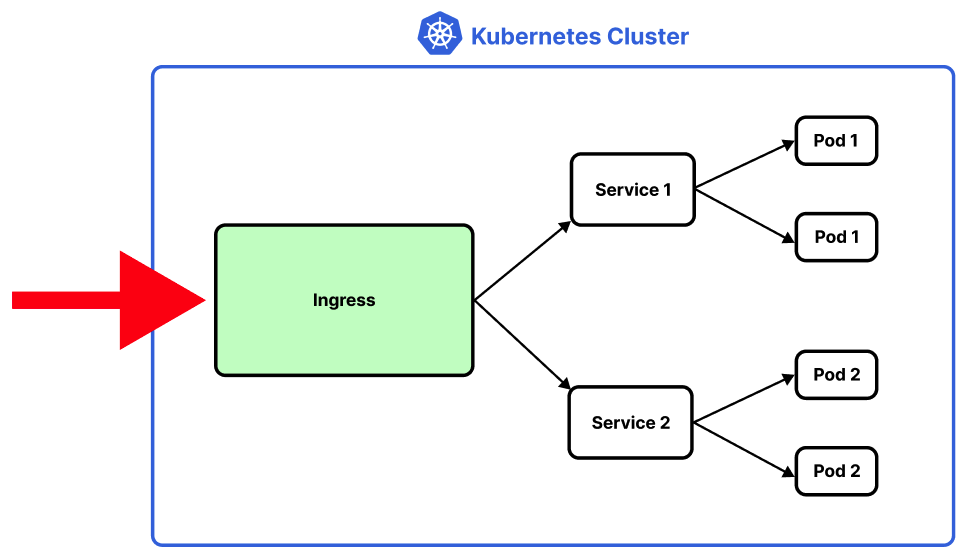
# Ingress
인그레스(Ingress)는 크게 세 가지 기능을 제공하는 오브젝트다.
- 팟 외부 노출
- URL Path를 통한 포워딩
- SSL/TLS
# 세팅
인그레스를 테스트하기 위해 다음과 같이 두 디플로이먼트를 먼저 생성한다.
### deployment1.yml
apiVersion: apps/v1
kind: Deployment
metadata:
  name: deployment1
spec:
  replicas: 2
  selector:
    matchLabels:
      app: pod1-label
  template:
    metadata:
      name: pod1
      labels:
        app: pod1-label
    spec:
      containers:
        - name: nginx-container
          image: nginx:latest
          ports:
          - containerPort: 80
### deployment2.yml
apiVersion: apps/v1
kind: Deployment
metadata:
  name: deployment2
spec:
  replicas: 2
  selector:
    matchLabels:
      app: pod2-label
  template:
    metadata:
      name: pod2
      labels:
        app: pod2-label
    spec:
      containers:
        - name: nginx-container
          image: nginx:latest
          ports:
          - containerPort: 80
그리고 두 디플로이먼트에 대한 서비스를 생성한다.
# service1.yml
apiVersion: v1
kind: Service
metadata:
  name: service1
spec:
  ports:
    - name: service1-port
      port: 11111
      targetPort: 80
  selector:
    app: pod1-label
  type: ClusterIP
# service2.yml
apiVersion: v1
kind: Service
metadata:
  name: service2
spec:
  ports:
    - name: service2-port
      port: 22222
      targetPort: 80
  selector:
    app: pod2-label
  type: ClusterIP
두 서비스의 타입은 ClusterIP이므로 팟들이 외부에 노출되지 않는다.
# 인그레스 오브젝트 생성하기
인그레스 오브젝트는 YAML 설정파일에 다음과 같이 선언한다.
# my-ingress.yml
apiVersion: networking.k8s.io/v1
kind: Ingress
metadata:
  name: my-ingress
  annotations:
    kubernetes.io/ingress.class: "nginx"
spec:
  rules:
  - http:
      paths:
      - path: /service1
        pathType: Prefix
        backend:
          service:
            name: service1
            port:
              number: 11111
      - path: /service2
        pathType: Prefix
        backend:
          service:
            name: service2
            port:
              number: 22222
이제 설정파일로 인그레스 오브젝트를 생성한다.
$ kubectl apply -f my-ingress.yml
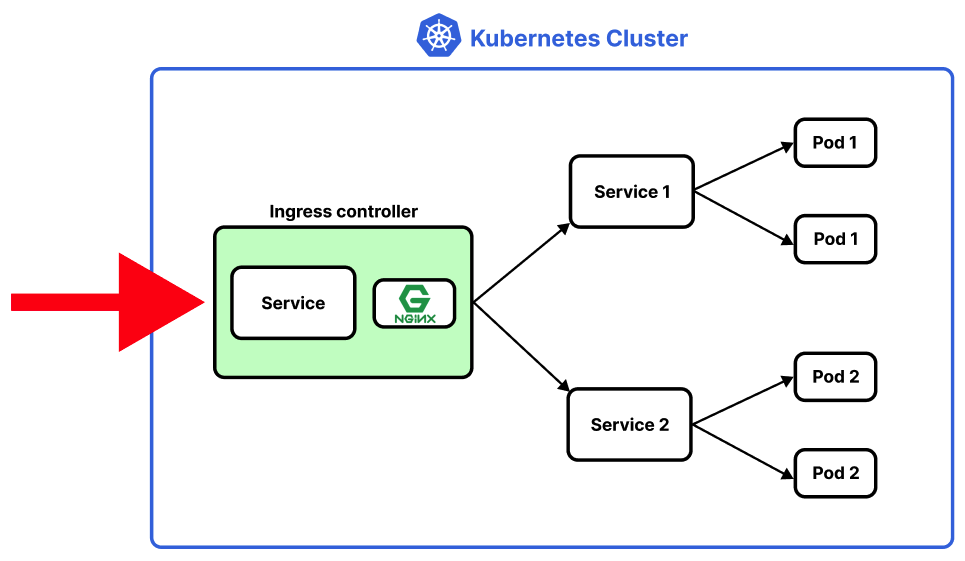
# 인그레스 컨트롤러 설치
인그레스 오브젝트만 생성해서는 아무 일도 일어나지 않는다. 외부 요청을 실제로 처리하는 서버가 필요하며, 이 서버를 인그레스 컨트롤러라고 한다. 인그레스 컨트롤러는 많은 제품군이 있으며, 여기서는 쿠버네티스 환경에서 활발히 사용되고 있는 Nginx 인그레스 컨트롤러를 사용해보자.
우선 다음 명령어를 입력하여 Nginx 인그레스 컨트롤러를 설치한다.
$ kubectl apply -f https://raw.githubusercontent.com/kubernetes/ingress-nginx/controller-v1.0.0/deploy/static/provider/baremetal/deploy.yaml
namespace/ingress-nginx created
serviceaccount/ingress-nginx created
configmap/ingress-nginx-controller created
clusterrole.rbac.authorization.k8s.io/ingress-nginx created
clusterrolebinding.rbac.authorization.k8s.io/ingress-nginx created
role.rbac.authorization.k8s.io/ingress-nginx created
rolebinding.rbac.authorization.k8s.io/ingress-nginx created
service/ingress-nginx-controller-admission created
service/ingress-nginx-controller created
deployment.apps/ingress-nginx-controller created
ingressclass.networking.k8s.io/nginx created
validatingwebhookconfiguration.admissionregistration.k8s.io/ingress-nginx-admission created
serviceaccount/ingress-nginx-admission created
clusterrole.rbac.authorization.k8s.io/ingress-nginx-admission created
clusterrolebinding.rbac.authorization.k8s.io/ingress-nginx-admission created
role.rbac.authorization.k8s.io/ingress-nginx-admission created
rolebinding.rbac.authorization.k8s.io/ingress-nginx-admission created
job.batch/ingress-nginx-admission-create created
job.batch/ingress-nginx-admission-patch created
Nginx 인그레스 컨트롤러를 설치하면 관련된 여러 오브젝트가 ingress-nginx 네임스페이스에 자동으로 생성된다. 우선 팟과 디플로이먼트를 확인해보자. Nginx 웹 서버가 팟으로 동작하는 것을 확인할 수 있다.
$ kubectl get pods -n ingress-nginx
NAME                                       READY   STATUS      RESTARTS   AGE
ingress-nginx-admission-create--1-x7fdd    0/1     Completed   0          4m42s
ingress-nginx-admission-patch--1-ncz4v     0/1     Completed   1          4m42s
ingress-nginx-controller-8cf5559f8-hvqkq   1/1     Running     0          4m42s
$ kubectl get deployments -n ingress-nginx
NAME                       READY   UP-TO-DATE   AVAILABLE   AGE
ingress-nginx-controller   1/1     1            1           5m
Nginx 웹 서버도 하나의 팟으로 동작하기 때문에 외부 노출을 위한 서비스가 필요하다. Nginx 인그레스 컨트롤러를 설치하면 필요한 서비스 또한 자동으로 생성된다.
$ kubectl get services -n ingress-nginx
NAME                                 TYPE        CLUSTER-IP       EXTERNAL-IP   PORT(S)                      AGE
ingress-nginx-controller             NodePort    10.108.230.135   <none>        80:32508/TCP,443:32527/TCP   5m13s
ingress-nginx-controller-admission   ClusterIP   10.96.200.134    <none>        443/TCP                      5m13s
결국 인그레스 컨트롤러는 크게 두 가지 요소로 구성된다는 것을 알 수 있다.
- 웹 서버 컨테이너를 내장한 팟
- 팟을 외부에 노출하고, 외부 요청을 내부로 포워딩해주는 서비스
DANGER
AWS EC2에서 쿠버네티스를 구축한 경우 보안 그룹에서 해당 포트를 개방해야한다.
이제 외부에서 인그레스 컨트롤러의 service1 서비스로 요청을 보내보자.
$ curl <워커노드 PUBLIC IP>:32508/service1
<!DOCTYPE html>
<html>
<head>
<title>Welcome to nginx!</title>
<style>
html { color-scheme: light dark; }
body { width: 35em; margin: 0 auto;
font-family: Tahoma, Verdana, Arial, sans-serif; }
</style>
</head>
<body>
<h1>Welcome to nginx!</h1>
<p>If you see this page, the nginx web server is successfully installed and
working. Further configuration is required.</p>

<p>For online documentation and support please refer to
<a href="http://nginx.org/">nginx.org</a>.<br/>
Commercial support is available at
<a href="http://nginx.com/">nginx.com</a>.</p>

<p><em>Thank you for using nginx.</em></p>
</body>
</html>
service2로의 요청도 처리되는 것을 확인할 수 있다.
$ curl <워커노드 PUBLIC IP>/service2
<!DOCTYPE html>
<html>
<head>
<title>Welcome to nginx!</title>
<style>
html { color-scheme: light dark; }
body { width: 35em; margin: 0 auto;
font-family: Tahoma, Verdana, Arial, sans-serif; }
</style>
</head>
<body>
<h1>Welcome to nginx!</h1>
<p>If you see this page, the nginx web server is successfully installed and
working. Further configuration is required.</p>

<p>For online documentation and support please refer to
<a href="http://nginx.org/">nginx.org</a>.<br/>
Commercial support is available at
<a href="http://nginx.com/">nginx.com</a>.</p>

<p><em>Thank you for using nginx.</em></p>
</body>
</html>
# Kustomize
Kustomize을 사용하면 선언적, 동적으로 쿠버네티스 yml 설정파일을 생성할 수 있다. 예를 들어 베이스가 되는 리소스 설정파일 템플릿을 만들고, 개발 환경과 운영 환경에 따라 다른 리소스 설정파일을 구성할 수 있다.
# Kustomize 설치
운영체제별로 Kustomize 설치 방법이 다르다. Ubuntu 환경에서는 다음과 같이 설치할 수 있다.
$ curl -s "https://raw.githubusercontent.com/kubernetes-sigs/kustomize/master/hack/install_kustomize.sh" | bash

$ sudo mv kustomize /usr/local/bin/

$ kustomize version
{Version:kustomize/v4.5.4 GitCommit:cf3a452ddd6f83945d39d582243b8592ec627ae3 BuildDate:2022-03-28T23:12:45Z GoOs:linux GoArch:amd64}
# 예제 디렉토리 구성하기
다음과 같은 구조로 디렉토리를 생성한다.
$ mkdir app
$ cd
$ tree .
.
├── base
└── overlays
    ├── dev
    └── prod
base에는 템플릿으로 사용할 리소스 설정을 생성한다. overlays에서는 템플릿을 사용하여 리소스 설정을 커스터마이징한다.
overlays/dev: 개발 환경을 위한 리소스 설정이 위치하는 디렉토리overlays/prod: 운영 환경을 위한 리소스 설정이 위치하는 디렉토리
# 템플릿 생성하기
base 디렉토리에 템플릿으로 사용할 리소스를 생성하자.
$ tree .
.
├── base
│   ├── nginx-deployment.yml
│   └── nginx-service.yml
│   └── kustomization.yml
└── overlays
    ├── dev
    └── prod
base/nginx-deployment.yml는 다음과 같다.
# base/nginx-deployment.yml
apiVersion: apps/v1
kind: Deployment
metadata:
  name: nginx-deployment
spec:
  replicas: 3
  selector:
    matchLabels:
      app: nginx-pod-label
  template:
    metadata:
      name: nginx-pod
      labels:
        app: nginx-pod-label
    spec:
      containers:
        - name: nginx-container
          image: nginx:latest
          ports:
          - containerPort: 80
base/nginx-service.yml는 다음과 같다.
# base/nginx-service.yml
apiVersion: v1
kind: Service
metadata:
  name: nginx-service-nodeport
spec:
  ports:
    - name: nginx-pods-port
      port: 9999
      targetPort: 80
  selector:
    app: nginx-pod-label
  type: NodePort
kustomization.yml은 kustomize의 핵심이 되는 파일이다. 이 파일에는 사용할 자원과 커스터마이징 방법을 나열한다.
우선 템플릿에서 사용할 자원들을 base/kustomization.yml에 나열하자.
apiVersion: kustomize.config.k8s.io/v1beta1
kind: Kustomization

resources:  # 사용할 자원들을 나열한다.
- nginx-deployment.yml
- nginx-service.yml
이제 kustomize build <경로> 명령어를 실행해보자.
$ kustomize build .
base/kustomization.yml을 적용하여 새롭게 생성한 리소스 설정파일이 출력된다.
apiVersion: v1
kind: Service
metadata:
  name: nginx-service-nodeport
spec:
  ports:
  - name: nginx-pods-port
    port: 9999
    targetPort: 80
  selector:
    app: nginx-pod-label
  type: NodePort
---
apiVersion: apps/v1
kind: Deployment
metadata:
  name: nginx-deployment
spec:
  replicas: 3
  selector:
    matchLabels:
      app: nginx-pod-label
  template:
    metadata:
      labels:
        app: nginx-pod-label
      name: nginx-pod
    spec:
      containers:
      - image: nginx:latest
        name: nginx-container
        ports:
        - containerPort: 80
다음 명령어를 사용하면 kustomization.yml 설정파일을 통해 리소스를 바로 생성할 수 있다.
$ kustomize build <경로> | kubectl apply -f -
# 개발 환경 커스터마이징
이제 템플릿을 사용하여 리소스 설정을 커스터마이징해보자. overlays/dev에 kustomization.yml 파일을 생성한다.
$ tree .
.
├── base
│   ├── kustomization.yml
│   ├── nginx-deployment.yml
│   └── nginx-service.yml
└── overlays
    ├── dev
    │   └── kustomization.yml
    └── prod
dev/kustomization.yml는 두 가지 역할을 하고 있다.
- 네임스페이스를
default로 지정한다. - 오브젝트 이름에 접두어
dev-를 추가하고 있다.
apiVersion: kustomize.config.k8s.io/v1beta1
kind: Kustomization
namespace: default    # 네임스페이스 지정
bases:
- ../../base          # base 디렉토리 경로 지정
namePrefix: dev-      # dev- 접두어 추가
이제 kustomize build <경로> 명령어를 실행해보자.
$ kustomize build .
접두어와 네임스페이스가 추가된 새로운 설정 파일이 출력된다.
apiVersion: v1
kind: Service
metadata:
  name: dev-nginx-service-nodeport  # 접두어 dev 추가
  namespace: default                # 네임스페이스 추가
spec:
  ports:
  - name: nginx-pods-port
    port: 9999
    targetPort: 80
  selector:
    app: nginx-pod-label
  type: NodePort
---
apiVersion: apps/v1
kind: Deployment
metadata:
  name: dev-nginx-deployment  # 접두어 dev- 추가
  namespace: default          # 네임스페이스 추가
spec:
  replicas: 3
  selector:
    matchLabels:
      app: nginx-pod-label
  template:
    metadata:
      labels:
        app: nginx-pod-label
      name: nginx-pod
    spec:
      containers:
      - image: nginx:latest
        name: nginx-container
        ports:
        - containerPort: 80
# 운영 환경 커스터마이징
운영 환경을 위한 kustomization.yml 파일을 overlays/prod에 구성하자.
$ tree .
.
├── base
│   ├── kustomization.yml
│   ├── nginx-deployment.yml
│   └── nginx-service.yml
└── overlays
    ├── dev
    │   └── kustomization.yml
    └── prod
        └── kustomization.yml
prod/kustomization.yml는 두 가지 역할을 하고 있다.
- 네임스페이스를
default로 지정한다. - 오브젝트 이름에 접두어
prod-를 추가하고 있다.
apiVersion: kustomize.config.k8s.io/v1beta1
kind: Kustomization
namespace: default    # 네임스페이스 지정
bases:
- ../../base          # base 디렉토리 경로 지정
namePrefix: prod-     # prod- 접두어 추가
이제 kustomize build <경로> 명령어를 실행해보자.
$ kustomize build .
접두어와 네임스페이스가 추가된 새로운 설정 파일이 출력된다
apiVersion: v1
kind: Service
metadata:
  name: prod-nginx-service-nodeport # 접두어 prod- 추가
  namespace: default                # 네임스페이스 추가
spec:
  ports:
  - name: nginx-pods-port
    port: 9999
    targetPort: 80
  selector:
    app: nginx-pod-label
  type: NodePort
---
apiVersion: apps/v1
kind: Deployment
metadata:
  name: prod-nginx-deployment # 접두어 prod- 추가
  namespace: default          # 네임스페이스 추가
spec:
  replicas: 3
  selector:
    matchLabels:
      app: nginx-pod-label
  template:
    metadata:
      labels:
        app: nginx-pod-label
      name: nginx-pod
    spec:
      containers:
      - image: nginx:latest
        name: nginx-container
        ports:
        - containerPort: 80
# 이미지 태그 변경하기
kustomize edit set image <이미지이름>:<태그이름> 명령어를 사용하면 이미지의 태그를 쉽게 변경할 수 있다.
우선 base/deployment.yml 파일을 살펴보자. 1.0 버전의 nginx 이미지를 사용하고 있다.
apiVersion: apps/v1
kind: Deployment
metadata:
  name: nginx-deployment
spec:
  replicas: 3
  selector:
    matchLabels:
      app: nginx-pod-label
  template:
    metadata:
      name: nginx-pod
      labels:
        app: nginx-pod-label
    spec:
      containers:
        - name: nginx-container
          image: nginx:1.0
          ports:
          - containerPort: 80
이제 overlays/dev에서 kustomize edit set image <이미지이름>:<태그이름> 명령어를 사용하며 1.2 버전으로 마이그레이션한다.
$ kustomize edit set image nginx:1.2
overlays/dev/kustomization.yml을 확인해본다. 1.2 태그를 반영하도록 수정되어있다.
# overlays/dev/kustomization.yml
apiVersion: kustomize.config.k8s.io/v1beta1
kind: Kustomization
namespace: default
namePrefix: dev-
resources:
- ../../base
images:
- name: nginx
  newTag: "1.2"
이제 kustomize build . 명령어를 실행해보자.
$ kustomize build .
apiVersion: v1
kind: Service
metadata:
  name: dev-nginx-service-nodeport
  namespace: default
spec:
  ports:
  - name: nginx-pods-port
    port: 9999
    targetPort: 80
  selector:
    app: nginx-pod-label
  type: NodePort
---
apiVersion: apps/v1
kind: Deployment
metadata:
  name: dev-nginx-deployment
  namespace: default
spec:
  replicas: 3
  selector:
    matchLabels:
      app: nginx-pod-label
  template:
    metadata:
      labels:
        app: nginx-pod-label
      name: nginx-pod
    spec:
      containers:
      - image: nginx:1.2
        name: nginx-container
        ports:
        - containerPort: 80
# 패치 파일 사용하기
별도의 패치 파일을 사용할 수도 있다. 우선 base/deployment.yml 파일을 다음과 같이 수정한다.
apiVersion: apps/v1
kind: Deployment
metadata:
  name: nginx-deployment
spec:
  replicas: 3 ## 3개의 레플리카 사용
  selector:
    matchLabels:
      app: nginx-pod-label
  template:
    metadata:
      name: nginx-pod
      labels:
        app: nginx-pod-label
    spec:
      containers:
        - name: nginx-container
          ## image: nginx:latest <<<< 사용할 이미지를 주석 처리
          ports:
          - containerPort: 80
그리고 overlays/prod 디렉토리에 patch.yml 패치 파일을 생성한다. 이 파일은 두 가지 역할을 한다.
- 레플리카셋을 4개로 변경한다.
- 컨테이너 이미지를 지정한다.
# overlays/prod/patch.yml
apiVersion: apps/v1
kind: Deployment
metadata:
  name: nginx-deployment
spec:
  replicas: 4
  template:
    spec:
      containers:
        - name: nginx-container
          image: nginx:1.0
이제 overlays/prod/kustomization.yml을 다음과 같이 수정한다.
# overlays/prod/kustomization.yml
apiVersion: kustomize.config.k8s.io/v1beta1
kind: Kustomization
namespace: default
bases:
- ../../base
namePrefix: prod-
patchesStrategicMerge:
- patch.yml
patchesStrategicMerge에 사용할 패치 파일들을 나열한다. 이 속성은 다음과 같이 동작한다.
- 패치파일에 선언된 속성이 템플릿 파일에 없으면 속성을 추가한다.
- 패치파일에 선언된 속성이 템플릿 파일에 있으면 덮어쓴다.
이제 kustomize build <경로> 명령어로 결과물을 확인해보자.
$ kustomize build .
apiVersion: v1
kind: Service
metadata:
  name: prod-nginx-service-nodeport
  namespace: default
spec:
  ports:
  - name: nginx-pods-port
    port: 9999
    targetPort: 80
  selector:
    app: nginx-pod-label
  type: NodePort
---
apiVersion: apps/v1
kind: Deployment
metadata:
  name: prod-nginx-deployment
  namespace: default
spec:
  replicas: 4
  selector:
    matchLabels:
      app: nginx-pod-label
  template:
    metadata:
      labels:
        app: nginx-pod-label
      name: nginx-pod
    spec:
      containers:
      - image: nginx:1.0
        name: nginx-container
        ports:
        - containerPort: 80
패치 파일이 적용되어 레플리카 개수가 4개로 변경되었다. 또한 컨테이너 이미지의 이름과 버전이 추가되었다.